Hyundai i30 (PD): If you have a flat tyre (with tyre mobility kit) / Components of the Tyre Mobility Kit
â– Type A

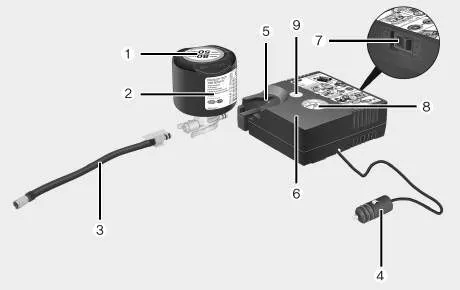
â– Type B
1. Speed-restriction label
2. Sealant bottle and label with speed
restriction
3. Filling hose from sealant bottle to
wheel
4. Connectors and cable for the power
outlet direct connection
5. Holder for the sealant bottle
6. Compressor
7. ON/OFF switch
8. Pressure gauge for displaying the
tyre inflation pressure
9. Button for reducing the tyre inflation
pressure
Connectors, cable and connection hose are stored in the compressor housing.
Strictly follow the specified sequence, otherwise the sealant may escape under high pressure.
WARNING
Expired sealant
Do not use the Tyre sealant after the sealant has expired (i.e. pasted the expiration date on the sealant container). This can increase the risk of tyre failure.
WARNING
Sealant
- Keep out of reach of children.
- Avoid contact with eyes.
- Do not swallow.
Park your car at the side of the road so that you can work with the Tyre Mobility Kit away from moving traffic. To be sure your vehicle will not move, even when you're on fairly level ground, always set your parking brake.
CAUTION Detach the speed restriction label (1) from the sealant bottle (2), and place it in a highly visible place inside the vehicle such as on the steering wheel to remind the driver not to drive too fast.
Other information:
Hyundai i30 (PD) 2018-2024 Owner's Manual: Trailer towing
If you are considering to tow with your vehicle, you should first your country's legal requirements. As laws vary the requirements for towing trailers, cars, or other types of vehicles or apparatus may differ. Ask a HYUNDAI authorised repairer for further details before towing.
Hyundai i30 (PD) 2018-2024 Owner's Manual: Hazard warning flasher
The hazard warning flasher serves as a warning to other drivers to exercise extreme caution when approaching, overtaking, or passing your vehicle. It should be used whenever emergency repairs are being made or when the vehicle is stopped near the edge of a roadway.
Categories
- Manuals Home
- Hyundai i30 Owners Manual
- Speed Limiter Indicator Light. SPORT Mode Indicator Light. ECO Mode Indicator Light
- Engine coolant
- Engine oil
- New on site
- Most important about car
