Hyundai i-30: Roof Trim / Roof Trim Assembly
Hyundai i30 (PD) 2018-2025 Service Manual / Body (Interior and Exterior) / Roof Trim / Roof Trim Assembly
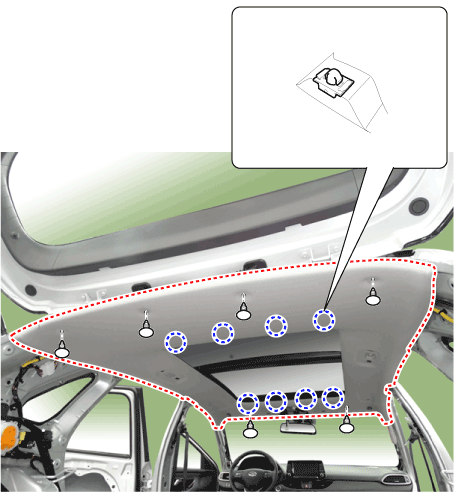
Components and components location
| Component Location |

| 1. Roof Trim
Assembly |
Repair procedures
| Replacement |
|

|

| 1. |
Remove the front seat.
(Refer to Front Seat - "Front Seat Assembly")
|
| 2. |
Remove the rear seat.
(Refer to Rear Seat - "Rear Seat Assembly")
|
| 3. |
Remove the front pillar trim.
(Rear to Interior Trim - "Front Pillar Trim")
|
| 4. |
Remove the center pillar lower trim.
(Rear to Interior Trim - "Center Pillar Trim")
|
| 5. |
Remove the center pillar upper trim.
(Rear to Interior Trim - "Center Pillar Trim")
|
| 6. |
Remove the rear pillar trim.
(Rear to Interior Trim - "Rear Pillar Trim")
|
| 7. |
Remove the sunvisor and retainer.
(Rear to Roof Trim - "Sunvisor")
|
| 8. |
Remove the assist handle.
(Rear to Roof Trim - "Assist Handle")
|
| 9. |
Remove the overhead console lamp.
(Rear to Body Electrical System - "Overhead Console Lamp")
|
| 10. |
Remove the room lamp.
(Rear to Body Electrical System - "Room Lamp")
|
| 11. |
Remove the ECM mirror connector.
(Refer to Body Electrical System - "Electro Chromic Inside Rear View
Mirror")
|
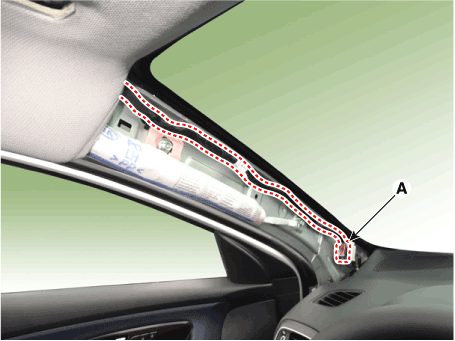
| 12. |
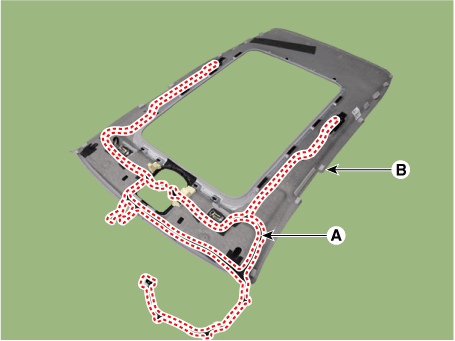
Disconnect the roof trim main connector (A) and the mounting clips in
the front pillar.
|
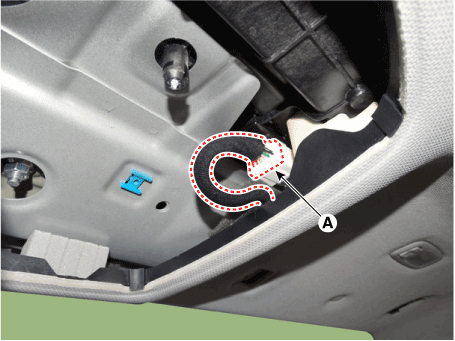
| 13. |
Disconnect the sunroof motor connector (A).
|
| 14. |
Remove the roof trim mounting clip and remove the roof trim assembly
(A).
|
| 15. |
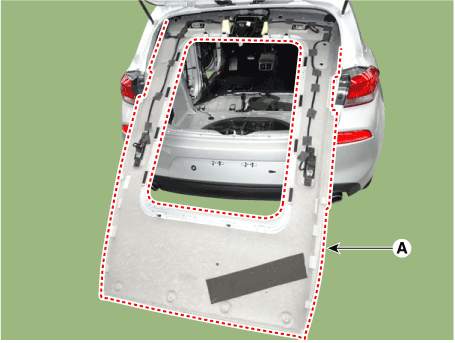
Remove the roof trim assembly (A) from the body panel and then carry
it out of the vehicle through the tailgate.
|
| 16. |
Carefully remove the tail gate weatherstrip.
|
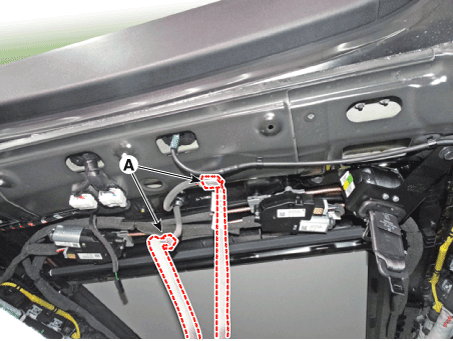
| 17. |
Disconnect the roof antenna connector (A).
|
| 18. |
Remove the roof trim assembly (A) from the vehicle through the tail
gate.
|
| 19. |
Remove the vanity lamp.
(Refer to Body Electrical - "Vanity Lamp")
|
| 20. |
Remove roof trim wiring harness (A) from the roof trim (B).
|

| 21. |
To install, reverse removal procedure.
|
 Assist Handle
Components and components location
Component Location
1. Assist handle
Repair procedures
Replacement
•
Put on gloves to prevent hand injuries...

Other information:
Hyundai i30 (PD) 2018-2025 Service Manual: Description and operation
Description This specification applies to HCU (Hydraulic Control Unit) and ECU (Electronic Control Unit) of the HECU. (Hydraulic and Electronic Control Unit) This specification is for the wiring design and installation of ABS ECU...
Hyundai i30 (PD) 2018-2025 Owner's Manual: Other LCD display messages
Heated Steering Wheel turned off (if equipped) This message is displayed if you turn off the heated steering wheel. For more details, refer to “Heated Steering Wheel” in this chapter. Low washer fluid (if equipped) This warning message is displayed if the washer fluid level in the reservoir is nearly empty...
Categories
- Manuals Home
- 3rd Generation i30 Owners Manual
- 3rd Generation i30 Service Manual
- Front windscreen wiper service position
- To activate the ISG system
- Brake/clutch fluid
- New on site
- Most important about car
Air bag - supplemental restraint system
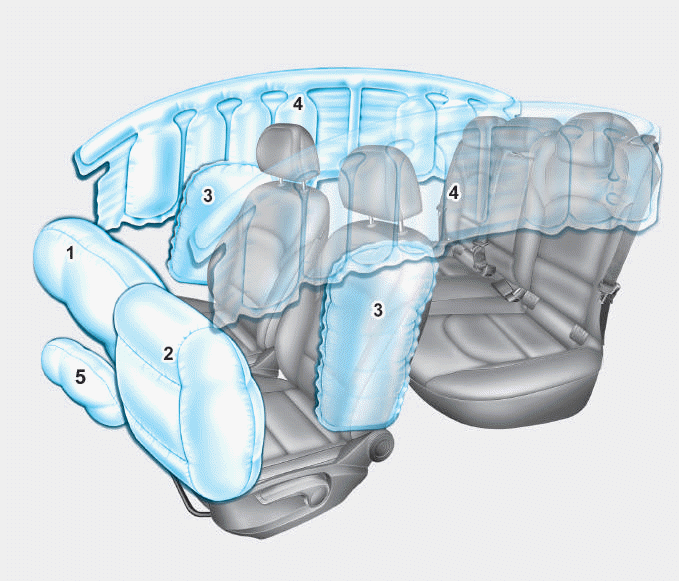
1. Driver’s front air bag
2. Passenger’s front air bag
3. Side air bag*
4. Curtain air bag*
5. Knee air bag*
6. Front passenger air bag ON/OFF
switch

Copyright © 2025 www.hi30.net