Hyundai i30 (PD): Light bulbs / Front fog lamp
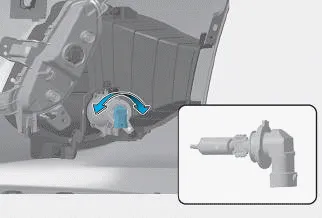
â– Type A
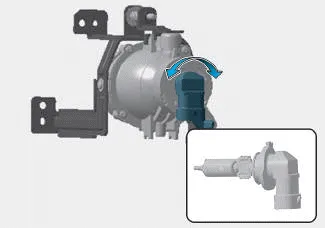
â– Type B
1. Loosen the pin-type retainers of the under cover and then remove the undercover.
2. Reach your hand into the back of the front bumper.
3. Disconnect the power connector from the socket.
4. Remove the bulb-socket from the housing by turning the socket counterclockwise until the tabs on the socket align with the slots of the housing.
5. Install a new bulb-socket into the housing by aligning the tabs on the socket with the slots in the housing. Push the socket into the housing and turn the socket clockwise.
Type A Type B (1) Headlamp (High) (2) Headlamp (Low) (3) Turn signal lamp (4) Daytime running light (if equipped) (5) Position lamp (6) Static bending light WARNING Handle halogen bulbs with care.
Headlamp aiming 1. Inflate the tyres to the specified pressure and remove any loads from the vehicle except the driver, spare tyre, and tools.
Other information:
Hyundai i30 (PD) 2018-2024 Owner's Manual: Special driving conditions
Hazardous driving conditions When hazardous driving elements are encountered such as water, snow, ice, mud and sand, take the following precautions: Drive cautiously and maintain a longer braking distance. Avoid abrupt braking or steering.
Hyundai i30 (PD) 2018-2024 Owner's Manual: Notes on the safe use of the Tyre Mobility Kit
Park your car at the side of the road so that you can work with the Tyre Mobility Kit away from moving traffic. To be sure your vehicle will not move, even when you're on fairly level ground, always set your parking brake. Only use the Tyre Mobility Kit for sealing/ inflation passenger car tyres.
Categories
- Manuals Home
- Hyundai i30 Owners Manual
- Engine oil
- Maintenance
- Your vehicle at a glance
- New on site
- Most important about car
