Hyundai i30 (PD): Light bulbs / Rear combination lamp bulb replacement
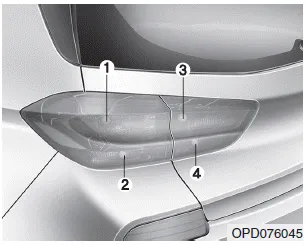
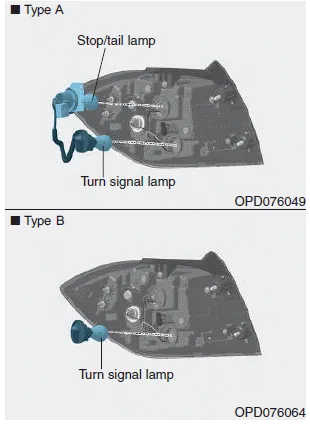
Type A (5 Door)
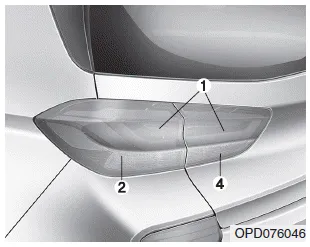
Type B (5 Door)
Type C (5 Door, 5 Door (N Line))
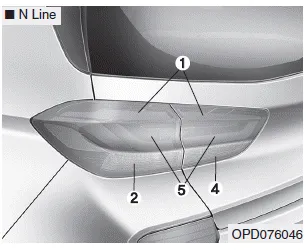
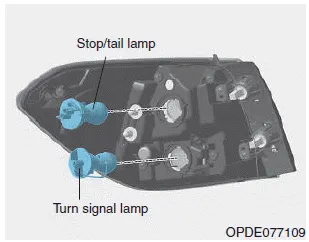
(1) Stop/Tail lamp
(2) Turn signal lamp
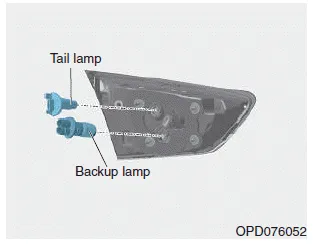
(3) Tail lamp
(4) Backup lamp
(5) Stop lamp
Stop/Tail lamp (Type A) and turn signal lamp

1. Turn off the engine.
2. Open the tailgate.
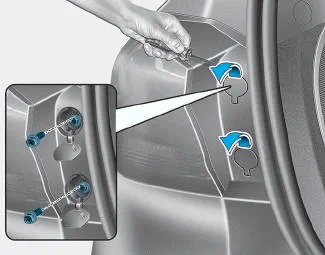
3. Open the lamp assembly retaining screw covers.
4. Loosen the lamp assembly retaining screws with a cross-tip screwdriver.
5. Remove the rear combination lamp assembly from the body of the vehicle.
6. Remove the socket from the assembly by turning the socket counterclockwise until the tabs on the socket align with the slots on the assembly.
7. Remove the bulb from the socket by pressing it in and rotating it counterclockwise until the tabs on the bulb align with the slots in the socket. Pull the bulb out of the socket.
8. Insert a new bulb by inserting it into the socket and rotating it until it locks into place.
9. Install the socket into the assembly by aligning the tabs on the socket with the slots in the assembly. Push the socket into the assembly and turn the socket clockwise.
10. Reinstall the lamp assembly to the body of the vehicle.
Stop/Tail lamp (Type B, Type C)
If the LED lamp does not operate, we recommend that you have the vehicle checked by a HYUNDAI authorised repairer.
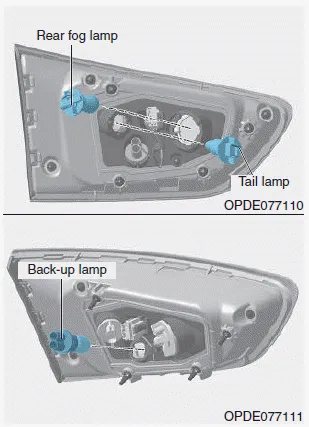
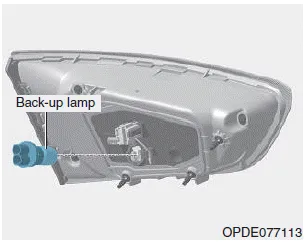
Type A - Tail lamp and backup lamp
Type B, Type C - Backup lamp

1. Turn off the engine.
2. Open the tailgate.
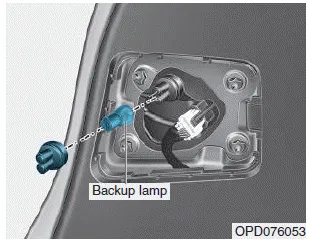
3. Remove the service cover using a flat-blade screwdriver.
Type A
4. Remove the socket from the assembly by turning the socket counterclockwise until the tabs on the socket align with the slots on the assembly.
5. Remove the bulb by pulling it straight out.
6. Insert a new bulb by inserting it into the socket and rotating it until it locks into place.
7. Install the socket into the assembly by aligning the tabs on the socket with the slots in the assembly. Push the socket into the assembly and turn the socket clockwise.
8. Reinstall the service cover.
Type B, Type C
4. Remove the bulb by pulling it straight out.
5. Insert a new bulb by inserting it into the socket and rotating it until it locks into place.
6. Install the socket into the assembly by aligning the tabs on the socket with the slots in the assembly. Push the socket into the assembly and turn the socket clockwise.
7. Reinstall the service cover.
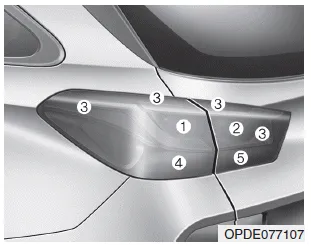
Type D (Wagon)
(1) Stop/Tail lamp
(2) Tail lamp
(3) Turn signal lamp
(4) Back-up lamp
(5) Rear fog lamp
Stop/Tail lamp and turn signal lamp
1. Turn off the engine.
2. Open the tailgate.
3. Open the lamp assembly retaining screw covers.
4. Loosen the lamp assembly retaining screws with a cross-tip screwdriver.

5. Remove the rear combination lamp assembly from the body of the vehicle.
6. Remove the socket from the assembly by turning the socket counterclockwise until the tabs on the socket align with the slots on the assembly.
7. Remove the bulb from the socket by pressing it in and rotating it counterclockwise until the tabs on the bulb align with the slots in the socket. Pull the bulb out of the socket.
8. Insert a new bulb by inserting it into the socket and rotating it until it locks into place.
9. Install the socket in the assembly by aligning the tabs on the socket with the slots in the assembly. Push the socket into the assembly and turn the socket clockwise.
10. Reinstall the lamp assembly to the body of the vehicle.
Tail lamp, back-up lamp and rear fog lamp

1. Turn off the engine.
2. Open the tailgate.
3. Remove the service cover using a flat-blade screwdriver.
4. Remove the socket from the assembly by turning the socket counterclockwise until the tabs on the socket align with the slots on the assembly.
5. Remove the bulb by pulling it straight out.
6. Insert a new bulb by inserting it into the socket and rotating it until it locks into place.
7. Install the socket into the assembly by aligning the tabs on the socket with the slots in the assembly. Push the socket into the assembly and turn the socket clockwise.
8. Reinstall the service cover.
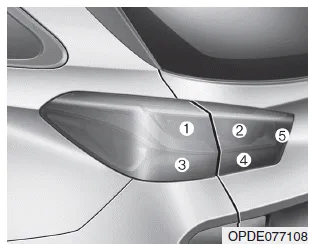
Type E (Wagon)
(1) Stop lamp
(2) Stop lamp/Rear fog lamp
(3) Tail lamp
(4) Turn signal lamp
(5) Back-up lamp
Stop lamp, tail lamp and stop lamp/rear fog lamp
If the LED lamp does not operate, we recommend that you have the vehicle checked by a HYUNDAI authorised repairer.
Turn signal lamp

1. Turn off the engine.
2. Open the tailgate.
3. Open the lamp assembly retaining screw covers.
4. Loosen the lamp assembly retaining screws with a cross-tip screwdriver.

5. Remove the rear combination lamp assembly from the body of the vehicle.

6. Remove the socket from the assembly by turning the socket counterclockwise until the tabs on the socket align with the slots on the assembly.
7. Remove the bulb from the socket by pressing it in and rotating it counterclockwise until the tabs on the bulb align with the slots in the socket. Pull the bulb out of the socket.
8. Insert a new bulb by inserting it into the socket and rotating it until it locks into place.
9. Install the socket into the assembly by aligning the tabs on the socket with the slots in the assembly. Push the socket into the assembly and turn the socket clockwise.
10. Reinstall the lamp assembly to the body of the vehicle
Backup lamp

1. Turn off the engine.
2. Open the tailgate.
3. Remove the service cover using a flat-blade screwdriver.
4. Remove the socket from the assembly by turning the socket counterclockwise until the tabs on the socket align with the slots on the assembly.
5. Remove the bulb by pulling it straight out.
6. Insert a new bulb by inserting it into the socket and rotating it until it locks into place.
7. Install the socket into the assembly by aligning the tabs on the socket with the slots in the assembly. Push the socket into the assembly and turn the socket clockwise.
8. Reinstall the service cover.
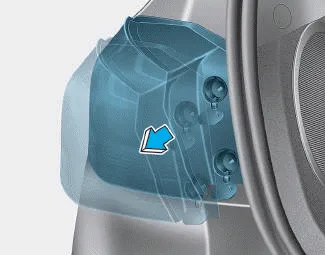
Type A If the light bulb does not operate, we recommend that you have the vehicle checked by a HYUNDAI authorised repairer. Type B 1.Remove the lamp assembly from the vehicle by prying the lens and pulling the assembly out.
1. Loosen the pin-type retainers and screws of the rear wheel guard and then detach it from the rear bumper. 2. Reach your hand into the back of the rear bumper.
Other information:
Hyundai i30 (PD) 2018-2024 Owner's Manual: Checking the tyre inflation pressure
1. After driving approximately 7~10 km (4~6 miles or about 10 min), stop at a safety location. 2. Connect the filling hose (3) of the compressor directly to the tyre valve. 3. Plug the compressor power cord into the vehicle power outlet.
Hyundai i30 (PD) 2018-2024 Owner's Manual: Fuel filter (for diesel)
Draining water from fuel filter The fuel filter in the diesel engine operates the critical function of separating water from the fuels and preventing accumulating of water in the base. When enough water is accumulated inside the fuel filter, the warning light () illuminates with the ignition switch in the ON position.
Categories
- Manuals Home
- Hyundai i30 Owners Manual
- Trip computer
- Brake/clutch fluid
- LKA system operation
- New on site
- Most important about car
