Hyundai i30 (PD): Automatic transmission / Transmission ranges
The indicator in the instrument cluster displays the shift lever position when the ignition switch is in the ON position.
P (Park)
Always come to a complete stop before shifting into P (Park).
To shift from P (Park), you must depress firmly on the brake pedal and make sure your foot is off the accelerator pedal.
If you have done all of the above and still cannot shift the lever out of P (Park), see "Shift-Lock Release" in this chapter.
The shift lever must be in P (Park) before turning the engine off.
WARNING
- Shifting into P (Park) whilst the vehicle is in motion may cause you to lose control of the vehicle.
- After the vehicle has stopped, always make sure the shift lever is in P (Park), apply the parking brake, and turn the engine off.
- When parking on an incline, place the shift lever in P (Park) and apply the parking brake to prevent the vehicle from rolling downhill.
- For safety, always engage the parking brake with the shift lever in the P (Park) position except for the case of emergency parking.
R (Reverse)
Use this position to drive the vehicle backward.
NOTICE
Always come to a complete stop before shifting into or out of R (Reverse); you may damage the transmission if you shift into R (Reverse) whilst the vehicle is in motion.
N (Neutral)
The wheels and transmission are not engaged.
Use N (Neutral) if you need to restart a stalled engine, or if it is necessary to stop with the engine ON. Shift into P (Park) if you need to leave your vehicle for any reason.
Always depress the brake pedal when you are shifting from N (Neutral) to another gear.
WARNING
Do not shift into gear unless your foot is firmly on the brake pedal. Shifting into gear when the engine is running at high speed can cause the vehicle to move very rapidly. You could lose control of the vehicle and hit people or objects.
D (Drive)
This is the normal driving position. The transmission will automatically shift through a 6-gear sequence, providing the best fuel economy and power.
For extra power when passing another vehicle or driving uphill, depress the accelerator fully. The transmission will automatically downshift to the next lower gear (or gears, as appropriate).
Manual shift mode
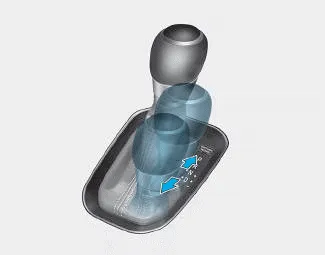
Whether the vehicle is stationary or in motion, manual shift mode is selected by pushing the shift lever from the D (Drive) position into the manual gate. To return to D (Drive) range operation, push the shift lever back into the main gate.
In manual shift mode, moving the shift lever backwards and forwards will allow you to select the desired range of gears for the current driving conditions.
+ (Up) : Push the lever forward once
to shift up one gear.
- (Down) : Pull the lever backwards
once to shift down one
gear.
Information
- Only the six forward gears can be selected in Manual Shift Mode. To reverse or park the vehicle, move the shift lever to the R (Reverse) or P (Park) position as required.
- Downshifts are made automatically when the vehicle slows down. When the vehicle stops, 1st gear is automatically selected.
- When the engine rpm approaches the red zone the transmission will upshift automatically.
- If the driver presses the lever to + (Up) or - (Down) position, the transmission may not make the requested gear change if the next gear is outside of the allowable engine rpm range. The driver must execute upshifts in accordance with road conditions, taking care to keep the engine rpms below the red zone.
- When driving on a slippery road, push the shift lever forward into the + (Up) position. This causes the transmission to shift into the 2nd gear which is better for smooth driving on a slippery road. Push the shift lever to the - (Down) side to shift back to the 1st gear.
Automatic transmission operation The automatic transmission has six forward speeds and one reverse speed. The individual speeds are selected automatically in the D (Drive) position.
Shift-lock system For your safety, the automatic transmission has a shift-lock system which prevents shifting the transmission from P (Park) into R (Reverse) unless the brake pedal is depressed.
Other information:
Hyundai i30 (PD) 2018-2024 Owner's Manual: Sensor to detect distance to the vehicle ahead
The Smart Cruise Control uses a sensor to detect distance to the vehicle ahead. Warning message SCC (Smart Cruise Control) disabled. Radar blocked When the sensor lens cover is blocked with dirt, snow, or debris, the Smart Cruise Control System operation may stop temporarily.
Hyundai i30 (PD) 2018-2024 Owner's Manual: Tyre replacement
If the tyre is worn evenly, a tread wear indicator will appear as a solid band across the tread. This shows there is less than 1/16 in. (1.6 mm) of tread left on the tyre. Replace the tyre when this happens. Do not wait for the band to appear across the entire tread before replacing the tyre.
Categories
- Manuals Home
- Hyundai i30 Owners Manual
- Specifications & Consumer information
- Light bulbs
- Maintenance
- New on site
- Most important about car
