Hyundai i30 (PD): Tyres and wheels / Tyre replacement
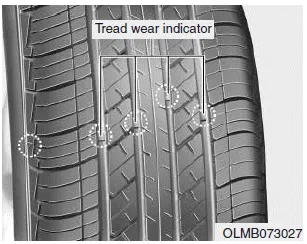
If the tyre is worn evenly, a tread wear indicator will appear as a solid band across the tread. This shows there is less than 1/16 in. (1.6 mm) of tread left on the tyre. Replace the tyre when this happens.
Do not wait for the band to appear across the entire tread before replacing the tyre.
WARNING
To reduce the risk of DEATH or SERIOUS INJURY:
- Replace tyres that are worn, show uneven wear, or are damaged. Worn tyres can cause loss of braking effectiveness, steering control, and traction.
- Always replace tyres with the same size as each tyre that was originally supplied with this vehicle. Using tyres and wheels other than the recommended sizes could cause unusual handling characteristics, poor vehicle control, or negatively affect your vehicleŌĆÖs Anti-Lock Brake System (ABS) resulting in a serious accident.
- When replacing tyres (or wheels), it is recommended to replace the two front or two rear tyres (or wheels) as a pair. Replacing just one tyre can seriously affect your vehicleŌĆÖs handling. If only replacing one pair of tyres, it is recommended to install the pair of new tyres on the rear axle.
- Tyres degrade over time, even when they are not being used. Regardless of the remaining tread, HYUNDAI recommends that tyres be replaced after six (6) years of normal service.
- Heat caused by hot climates or frequent high loading conditions can accelerate the aging process. Failure to follow this warning may cause sudden tyre failure, which could lead to a loss of vehicle control resulting in an accident.
Compact spare tyre replacement (if equipped)
A compact spare tyre has a shorter tread life than a regular size tyre. Replace it when you can see the tread wear indicator bars on the tyre. The replacement compact spare tyre should be the same size and design tyre as the one provided with your new vehicle and should be mounted on the same compact spare tyre wheel. The compact spare tyre is not designed to be mounted on a regular size wheel, and the compact spare tyre wheel is not designed for mounting a regular size tyre.
WARNING
The original tyre should be repaired or replaced as soon as possible to avoid failure of the spare and loss of vehicle control resulting in an accident.The compact spare tyre is for emergency use only. Do not operate your vehicle over 50 mph (80 km/h) when using the compact spare tyre.
The wheels on your vehicle were aligned and balanced carefully at the factory to give you the longest tyre life and best overall performance. In most cases, you will not need to have your wheels aligned again.
Wheel replacement When replacing the metal wheels for any reason, make sure the new wheels are equivalent to the original factory units in diameter, rim width and offset.
Other information:
Hyundai i30 (PD) 2018-2024 Owner's Manual: Vehicle weight
Two labels on your driverŌĆÖs door sill show how much weight your vehicle was designed to carry: the Tyre and Loading Information Label and the Certification Label. Before loading your vehicle, familiarize yourself with the following terms for determining your vehicle's weight ratings, from the vehicle's specifications and the Cert
Hyundai i30 (PD) 2018-2024 Owner's Manual: If the engine overheats
If your temperature gauge indicates overheating, you experience a loss of power, or hear loud pinging or knocking, the engine may be overheating. If this happens, you should: 1. Pull off the road and stop as soon as it is safe to do so. 2.
Categories
- Manuals Home
- Hyundai i30 Owners Manual
- Specifications & Consumer information
- Engine oil
- Headlamp, static bending lamp, position lamp, turn signal lamp and daytime running light bulb replacement
- New on site
- Most important about car
