Hyundai i-30: Seat Electrical / Air Ventilation Seat
Hyundai i30 (PD) 2018-2025 Service Manual / Body Electrical System / Seat Electrical / Air Ventilation Seat
Components and components location
| Component Location |
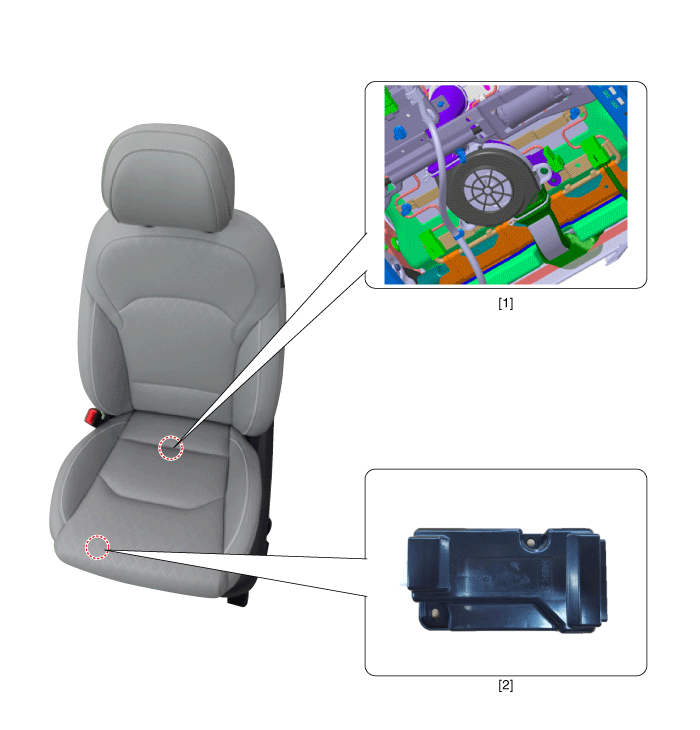
| 1. Ventilation
seat blower. |
2. Ventilation
seat unit (Assist seat only). |
Schematic diagrams
| Circuit Diagram |

Air Ventilation Unit Connector
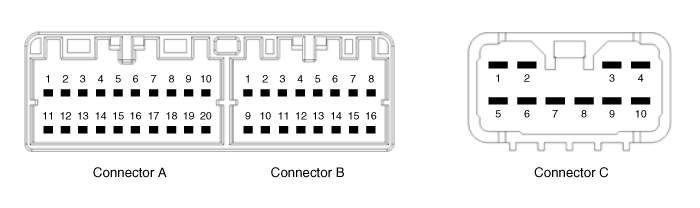
|
No |
Connecter A |
Connecter B |
Connecter C |
|
1 |
Seat vent unit IGN 1 |
Driver vent switch led (Low) |
vent / heater power |
|
2 |
Driver blower power |
Driver vent switch led (Mid) |
Driver heater power |
|
3 |
Driver blower speed |
Driver vent switch led (High) |
Driver heater ground |
|
4 |
Driver RPM input |
Driver NTC (+) |
Driver / Assist, Vent / Heater ground |
|
5 |
Driver heater switch |
- |
vent / heater power |
|
6 |
Driver vent switch |
Illumination (-) |
- |
|
7 |
Illumination (+) |
Driver NTC (-) |
Assist heater power |
|
8 |
Driver heater LED (Low) |
Driver blower ground |
- |
|
9 |
Driver heater LED (Mid) |
Driver vent led (Low) |
Assist heater ground |
|
10 |
Driver heater LED (High) |
Driver vent led (Mid) |
Driver / Assist, Vent / Heater ground |
|
11 |
Vent seat unit IGN 2 |
Driver vent led (High) |
|
|
12 |
Assist blower power |
Assist NTC (+) |
|
|
13 |
Assist blower speed |
- |
|
|
14 |
Assist blower RPM input |
- |
|
|
15 |
Assist heater switch |
Assist NTC (-) |
|
|
16 |
Assist vent switch |
Assist blower ground |
|
|
17 |
Detent |
|
|
|
18 |
Assist heater LED (Low) |
||
|
19 |
Assist heater LED (Mid) |
||
|
20 |
Assist heater LED (High) |
Repair procedures
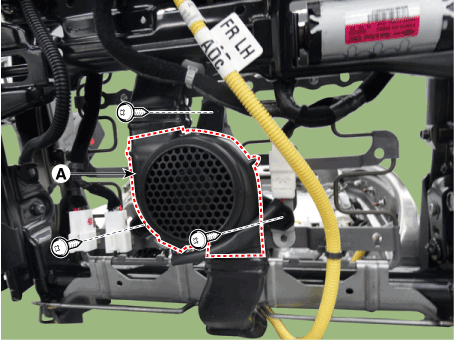
| Removal |
[Ventilation Blower]
| 1. |
Disconnect the negative (-) battery terminal.
|
| 2. |
Remove the front seat.
(Refer to Body - "Front Seat Assembly")
|
| 3. |
Remove the blower duct (A).
|
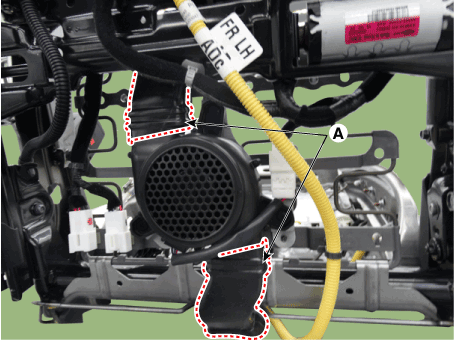
| 4. |
Remove the blower FAN (A) after removing the screws.
|
[Ventilation Seat Unit]
| 1. |
Disconnect the negative (-) battery terminal.
|
| 2. |
Remove the front assist seat.
(Refer to Body - "Front seat Assembly")
|
| 3. |
Loosen the screws from the ventilation seat unit (A).
|
| 4. |
Remove the ventilation seat unit (A) after disconnecting the connectors
(B).
|
| Installation |
[Ventilation Blower]
| 1. |
Install the blower fan.
|
| 2. |
Install the duct.
|
| 3. |
Install the front seat assembly.
|
| 4. |
Connect the negative (-) battery terminal.
|
[Ventilation Seat Unit]
| 1. |
Install the ventilation seat unit.
|
| 2. |
Install the front seat assembly.
|
| 3. |
Connect the negative (-) battery terminal.
|
| Inspection |
Ventilating seat consists of three units : the ventilating seat unit for control,
switch for input and and blower for output.
Diagnosis mode
| 1. |
You can enter the diagnosis mode by turning the heater seat button on.
|
| 2. |
You can enter the diagnosis mode by referring to following description.
|
| 3. |
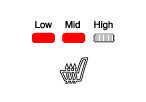
Press the heating wire switch as shown below.
|
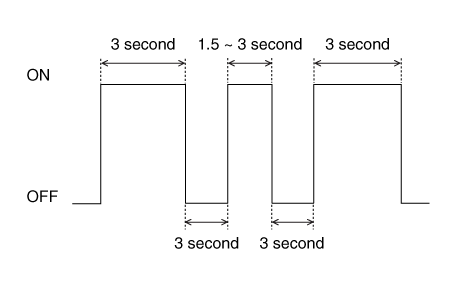
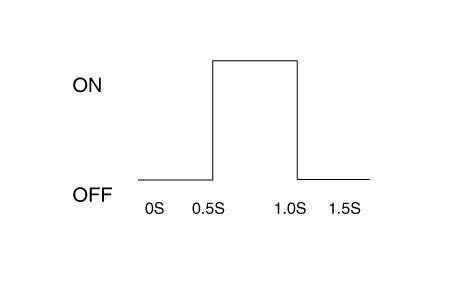
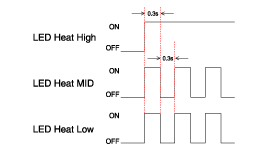
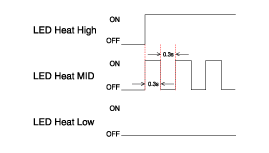
| 4. |
When the vehicle enters the diagnostic mode, the three LEDs (Low, Mid,
High) in the heating wire section blinks once for 0.5 seconds.
|
| 5. |
After entering the diagnostic mode, check the LED status to identify
the error.
|
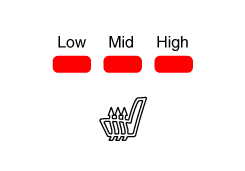


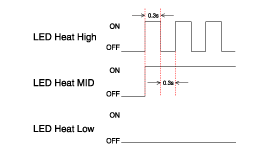
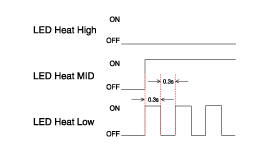
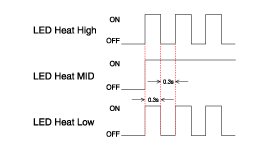
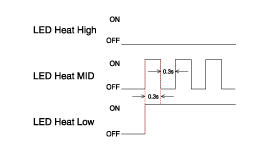
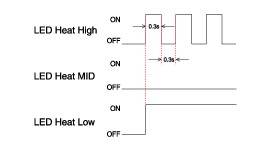
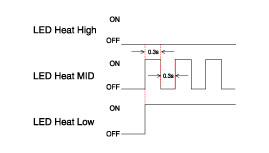
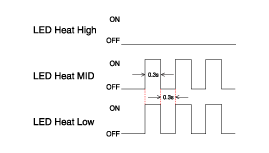
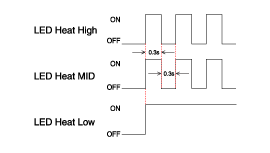
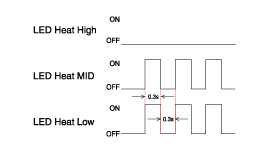
| 6. |
You can check the malfunctioning by checking the blinking LED.
|
| 7. |
The failure data is recorded to the memory by the ventilation seat unit.
|
| 8. |
Press the heating wire seat switch on the passenger side for 5 seconds
or more to make the LED blink four times and delete the failure data
in the memory.
|
| 9. |
Pressing the IGN OFF button will end the diagnosis mode for the heater
seat.
|
| 10. |
You can check whether the heating seat system works properly after turning
the IGN ON. If you want to check the error code, you can refer to the
procedure of 2 above.
|
 Seat Heater Switch
Components and components location
Components
[Front seat switch]
1. Driver seat
heater switch
2. Assist seat
heater switch
Schematic diagrams
Circuit Diagram
[Front Seat Heater Switch(Driver)]
[Front Seat Heater Switch(Assist)]
Repair procedures
Removal
[Front Seat]
1...
 Lumber Support Units
Repair procedures
Removal
1.
Disconnect the negative (-) battery terminal.
2.
Remove the front seat assembly...
Other information:
Hyundai i30 (PD) 2018-2025 Service Manual: Cylinder Head Cover
Components and components location Components 1. Cylinder head cover 2. Engine oil cap 3. Cylider head cover gasket 4. Camshaft position sensor 5. Cylider head cover oil seal 6. High pressure fuel pump gasket Repair procedures Removal • Use fender covers to avoid damaging painted surfaces...
Hyundai i30 (PD) 2018-2025 Owner's Manual: Hill-Start Assist Control (HAC)
The Hill-Start Assist Control (HAC) helps prevent the vehicle from rolling backwards when starting a vehicle from a stop on a hill. The system operates the brakes automatically for approximately 2 seconds and releases the brake after 2 seconds or when the accelerator pedal is depressed...
Categories
- Manuals Home
- 3rd Generation i30 Owners Manual
- 3rd Generation i30 Service Manual
- Scheduled maintenance services
- Trip computer
- Tyre pressure monitoring system
- New on site
- Most important about car
Panorama sunroof
If your vehicle is equipped with a sunroof, you can slide or tilt your sunroof with the sunroof control lever located on the overhead console.
The ignition switch must be in the ON position before you can open or close the sunroof.
The sunroof can be operated for approximately 30 seconds after the ignition key is removed or turned to the ACC or LOCK(or OFF) position. However, if the front door is opened, the sunroof cannot be operated even within 30 seconds.

Copyright © 2025 www.hi30.net