Hyundai i30 (PD): Where are the air bags? / Curtain air bags
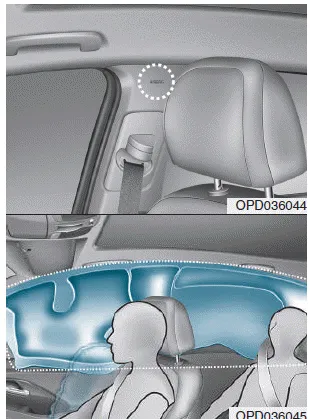
Curtain air bags are located along both sides of the roof rails above the front and rear doors.
They are designed to help protect the heads of the front seat occupants and the rear outboard seat occupants in certain side impact collisions.
The curtain air bags are designed to deploy during certain side impact collisions, depending on the crash severity, angle, speed and impact.
The curtain air bags on both sides of the vehicle are designed to deploy when a rollover is detected by a rollover sensor. (if equipped with rollover sensor)
The curtain air bags are not designed to deploy in all side impact or rollover situations.
WARNING
To reduce the risk of serious injury or death from an inflating curtain air bag, take the following precautions:
- All seat occupants must wear seat belts at all times to help keep occupants positioned properly.
- Properly secure Child Restraint System as far away from the door as possible.
- Do not place any objects over the air bag. Also, do not attach any objects around the area the air bag inflates such as the door, side door glass, front and rear pillar, roof side rail.
- Do not hang other objects except clothes, especially hard or breakable objects. In an accident, it may cause vehicle damage or personal injury.
- Do not allow passengers to lean their heads or bodies onto doors, put their arms on the doors, stretch their arms out of the window, or place objects between the doors and seats.
- Do not open or repair the side curtain air bags.
Your vehicle is equipped with a side air bag in each front seat. The purpose of the air bag is to provide the vehicleŌĆÖs driver and the front passenger with additional protection than that offered by the seat belt alone.
The SRS consists of the following components: (1) Driver's front air bag module/ DriverŌĆÖs knee air bag module (2) Passenger's front air bag module (3) Side air bag modules/ Side impact sensors (4) Curtain air bag modules (5) Rear Retractor pre-tensioner (6) Retractor pre-tensioner assemblies (7) Air bag warning light (8) SRS control module (SRSCM)/ Rollover sensor (9) Front impact sensors (10) Side pressure sensors (11) PassengerŌĆÖs front air bag ON/OFF indicator (12) PassengerŌĆÖs front air bag ON/OFF switch The SRSCM continually monitors all SRS components whilst the ignition switch is ON to determine if a crash impact is severe enough to require air bag deployment or pre-tensioner seat belt deployment.
Other information:
Hyundai i30 (PD) 2018-2024 Owner's Manual: Engine oil
Checking the engine oil level 1. Be sure the vehicle is on level ground. 2. Start the engine and allow it to reach normal operating temperature. 3. Turn the engine off and wait for a few minutes (about 5 minutes) for the oil to return to the oil pan.
Hyundai i30 (PD) 2018-2024 Owner's Manual: Engine coolant
The high-pressure cooling system has a reservoir filled with year-round antifreeze coolant. The reservoir is filled at the factory. Check the antifreeze protection and coolant concentration level at least once a year, at the beginning of the winter season, and before travelling to a colder climate.
Categories
- Manuals Home
- Hyundai i30 Owners Manual
- Low tyre pressure telltale
- Drive mode integrated control system
- Shift-lock system. Shift-lock release
- New on site
- Most important about car
