Hyundai i-30: Evaporative Emission Control System / Description and operation
Hyundai i30 (PD) 2018-2025 Service Manual / Emission Control System / Evaporative Emission Control System / Description and operation
| Description |
Evaporative emission control system prevents fuel vapor stored in fuel tank
from vaporizing into the atmosphere. When the fuel evaporates in the fuel tank,
the vapor passes through vent hoses or tubes to the canister filled with charcoal
and the canister temporarily holds the vapor in the charcoal. If ECM determines
to draw the gathered vapor into the combustion chambers during certain operating
conditions, it will use vacuum in intake manifold to move it.

 Schematic diagrams
Schematic Diagram
Canister
Canister is filled with charcoal and absorbs evaporated vapor in fuel tank.
The gathered fuel vapor in canister is drawn into the intake manifold by the
ECM/PCM when appropriate conditions are set...
Other information:
Hyundai i30 (PD) 2018-2025 Service Manual: Audio Remote Control
Components and components location Components 1. Left Remote Control Switch (Audio + Hands free) 2. Right Remote Control Switch (Cruise+Trip Computer+ Smart Cruise) Schematic diagrams Circuit Diagram [Audio] [Audio + Bluetooth] [Audio + Bluetooth + Voice] [Trip + Cruise] Repair procedures Inspection 1...
Hyundai i30 (PD) 2018-2025 Service Manual: Heater & A/C Control Unit (Manual)
Components and components location Components Connector [A] Pin NO Function Pin NO Function 1 Low 4 Middle Low 2 Common 5 Middle High 3 Ground 6 High Connector [B] Pin NO Function Pin NO Function 1 Battery (+) 21 IGN2 2 ISG B+ 22 IGN1 3 ILL+ (TAIL) 23 - 4 Sensor REF (+5V) 24 - 5 Mode actuator feedback 25 - 6 Temperature actuator feedback 26 - 7 Intake actuator feedback 27 MAX Blower ON Signal 8 EVAP Sensor (+) 28 PTC Relay 3 9 AMB Sensor (+) 29 PTC Relay 2 10 Mode actuator (Vent) 30 PTC on signal 11 Mode actuator (Defrost) 31 Detent OUT (-) 12 Temperature actuator (Cool) 32 - 13 Temperature actuator (Warm) 33 C_CAN High 14 Intake actuator (Fresh Air) 34 C_CAN Low 15 Intake actuator (Recirculated Air) 35 - 16 HTD (Rear defog indicator) 36 ECV + 17 Rear defog switch 37 ECV- (Ground) 18 - 38 Sensor ground 19 Blower ON signal to common 39 Ground 20 ILL- (RHEO) 40 Ground Repair procedures Replacement 1...
Categories
- Manuals Home
- 3rd Generation i30 Owners Manual
- 3rd Generation i30 Service Manual
- Front windscreen wiper service position
- Cruise control
- Scheduled maintenance services
- New on site
- Most important about car
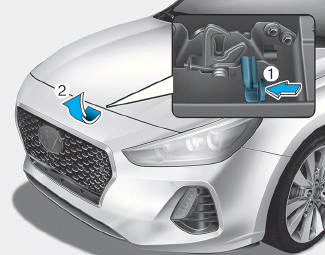
Bonnet
Opening the bonnet
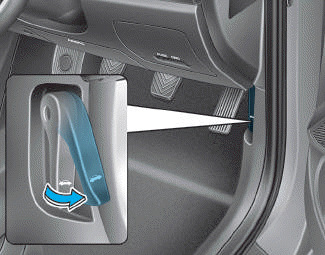
1. Park the vehicle and set the parking brake.
2. Pull the release lever to unlatch the bonnet. The bonnet should pop open slightly.

Copyright © 2025 www.hi30.net