Hyundai i-30: Fuel Delivery System / Release residual pressure in fuel line
Hyundai i30 (PD) 2018-2025 Service Manual / Engine Control / Fuel System / Fuel Delivery System / Release residual pressure in fuel line
| Release Residual Pressure in Fuel Line |
|

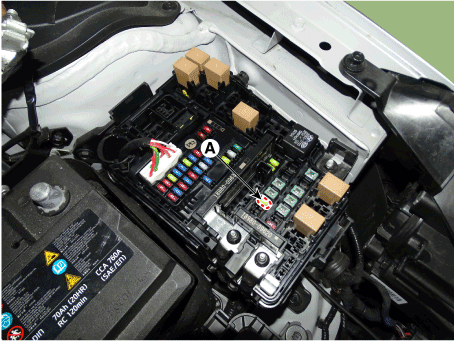
| 1. |
Turn the ignition switch OFF and disconnect the battery (-) cable.
|
| 2. |
Remove the fuel pump fuse (A).
|
| 3. |
Connect the battery (-) cable.
|
| 4. |
Start the engine and let idle, and then turn the ignition switch OFF
after the engine has stopped on its own.
|
| 5. |
Disconnect the battery (-) cable, and then install the fuel pump fuse
(A).
|
| 6. |
Connect the battery (-) cable.
|
| 7. |
Delete the diagnostic trouble code (DTC) related the fuel pump relay
with the diagnostic tool.
|
 Fuel pressure test
Fuel Pressure Test
1.
Release the residual pressure in fuel line.
(Refer to Fuel Delivery System - "Release Residual Pressure in Fuel
Line")
•
When removing the fuel pump relay, the diagnostic trouble
code (DTC) will be occurred...
 Fuel Tank
Repair procedures
Removal
1.
Turn the ignition switch OFF and disconnect the battery (-) terminal.
2...
Other information:
Hyundai i30 (PD) 2018-2025 Service Manual: Front Wiper Motor
Components and components location Component Location 1. Cap 2. Nut 3. Wiper arm & blade 4. Rivet 5. Cowl top cover 6. Bolt 7. Wiper motor & linkage assembly 8. Wiper motor connector Repair procedures Removal 1...
Hyundai i30 (PD) 2018-2025 Service Manual: Specifications
Specifications Front Suspension Item Specification Suspension type Mac Pherson Strut Shock absorber Type Conventional valve Rear Suspension Item Specification Suspension type Torsion Beam Axle Shock absorber Type Monotube Wheel & Tire Item Specification Normal load Maximum load Front Rear Front Rear Wheel Aluminum 6...
Categories
- Manuals Home
- 3rd Generation i30 Owners Manual
- 3rd Generation i30 Service Manual
- Engine compartment
- Headlamp, static bending lamp, position lamp, turn signal lamp and daytime running light bulb replacement
- Battery replacement
- New on site
- Most important about car
Air bag - supplemental restraint system
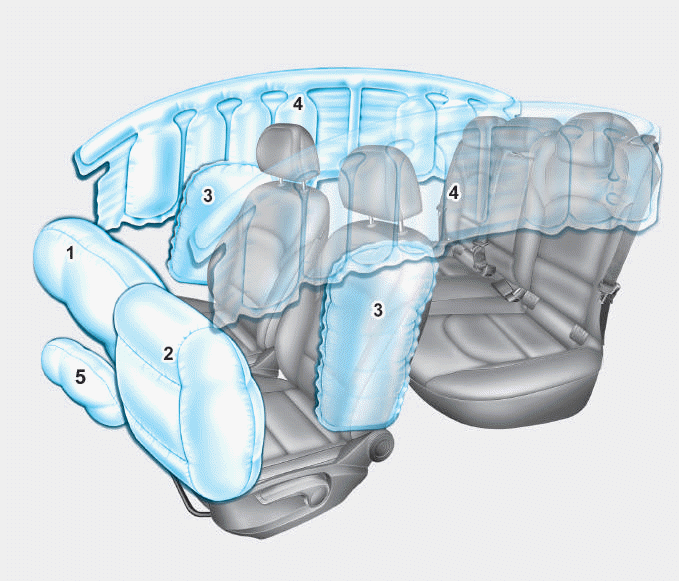
1. Driver’s front air bag
2. Passenger’s front air bag
3. Side air bag*
4. Curtain air bag*
5. Knee air bag*
6. Front passenger air bag ON/OFF
switch

Copyright © 2025 www.hi30.net