Hyundai i-30: Tail Gate / Tail Gate Lift
Hyundai i30 (PD) 2018-2025 Service Manual / Body (Interior and Exterior) / Tail Gate / Tail Gate Lift
Repair procedures
| Replacement |
|

| 1. |
Using a screwdriver, lift up slightly the socket clips (A) of both ends
on the lifter (B), and then remove the lifter from the bracket.
|
| 2. |
Push the socket of the lifter into the bracket for installation.
|
 Tail Gate Latch
Components and components location
Component Location
1. Tail Gate
latch assembly
Repair procedures
Replacement
•
Put on gloves to prevent hand injuries...
 Tail Gate Weatherstrip
Repair procedures
Replacement
1.
Remove the tail gate weatherstrip (A).
•
Do not apply sealant to the body...
Other information:
Hyundai i30 (PD) 2018-2025 Service Manual: MDPS Motor
Repair procedures Replacement 1. Disconnect the battery negative cable from the battery and then wait for at least 30 seconds. 2. Turn the steering wheel so that the front wheels are placed in the straight ahead position...
Hyundai i30 (PD) 2018-2025 Owner's Manual: Parking
Always come to a complete stop and continue to depress the brake pedal. Move the shift lever into the P (Park) position, apply the parking brake, and place the ignition switch in the LOCK/OFF position. Take the Key with you when exiting the vehicle...
Categories
- Manuals Home
- 3rd Generation i30 Owners Manual
- 3rd Generation i30 Service Manual
- Engine coolant
- LKA system operation
- Drive mode integrated control system
- New on site
- Most important about car
Power windows
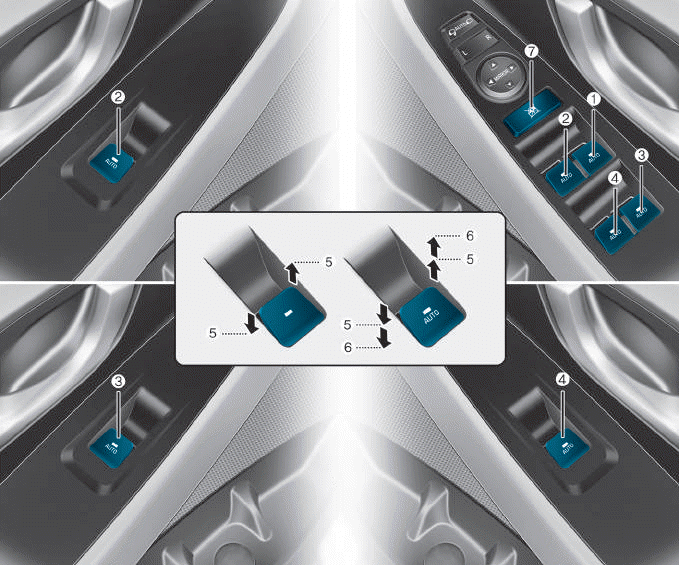
(1) Driver’s door power window
switch
(2) Front passenger’s door power
window switch
(3) Rear door (right) power window
switch
(4) Rear door (left) power window
switch
(5) Window opening and closing
(6) Automatic power window
(7) Power window lock switch

Copyright © 2025 www.hi30.net