Hyundai i-30: Tail Gate / Tail Gate Trim
Components and components location
Repair procedures
[Tail Gate lower trim]
| •
|
Put on gloves to prevent hand injuries.
|
|
| •
|
When removing with a flat-tip screwdriver or remover, wrap protective
tape around the tools to prevent damage to components.
|
| •
|
Take care not to scratch the body surface.
|
|
|
1. |
Remove the tail gate upper trim.
(Refer to Tail Gate - "Liftgate Trim")
|
|
2. |
Remove the tail gate side trim.
(Refer to Tail Gate - "Liftgate Trim")
|
|
3. |
After loosening the mounting screws, remove the tail gate trim (A).
|
|
4. |
To install, reverse removal procedure.
|
• |
Replace any damaged clips.
|
|
|
[Tail Gate upper trim]
| •
|
Put on gloves to prevent hand injuries.
|
|
| •
|
When removing with a flat-tip screwdriver or remover, wrap protective
tape around the tools to prevent damage to components.
|
| •
|
Take care not to scratch the body surface.
|
|
|
1. |
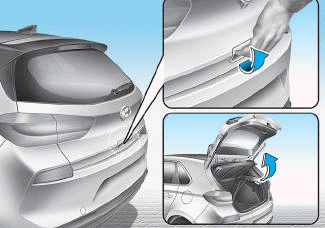
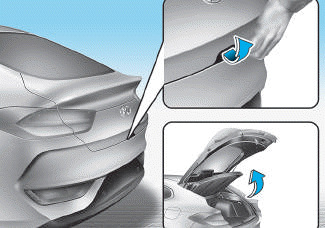
Using a screwdriver or remover, remove the tail gate upper trim (A).
|
|
2. |
To install, reverse removal procedure.
|
• |
Replace any damaged clips (or pin-type retainers).
|
|
|
[Tail Gate side trim]
| •
|
Put on gloves to prevent hand injuries.
|
|
| •
|
When removing with a flat-tip screwdriver or remover, wrap protective
tape around the tools to prevent damage to components.
|
| •
|
Take care not to scratch the body surface.
|
|
|
1. |
Remove the tail gate upper trim.
(Refer to Tail Gate - "Liftgate Trim")
|
|
2. |
After loosening the mounting screw, remove the tail gate side trim (A).
|
|
3. |
To install, reverse removal procedure.
|
• |
Replace any damaged clips (or pin-type retainers).
|
|
|
Components and components location
Component Location
1. Tail Gate
assembly
Repair procedures
Replacement
•
Wear gloves to protect hands from injury...
Components and components location
Component Location
1. Tail Gate
latch assembly
Repair procedures
Replacement
•
Put on gloves to prevent hand injuries...
Other information:
Components Location
LHD
1. Front strut
assembly
2. Drive shaft
3. Steering gearbox
4. Lower arm
5. Sub frame
6. Stabilizer bar
7. Front knuckle assembly
RHD
1...
Specifications
Smart Key Unit
Items
Specification
Rated voltage
DC 12V
Operating voltage
DC 9 - 16V
Operating temperature
-22°F to 167°F (-30°C to 75°C)
Load
Max...


 Tail Gate Assembly
 Tail Gate Latch