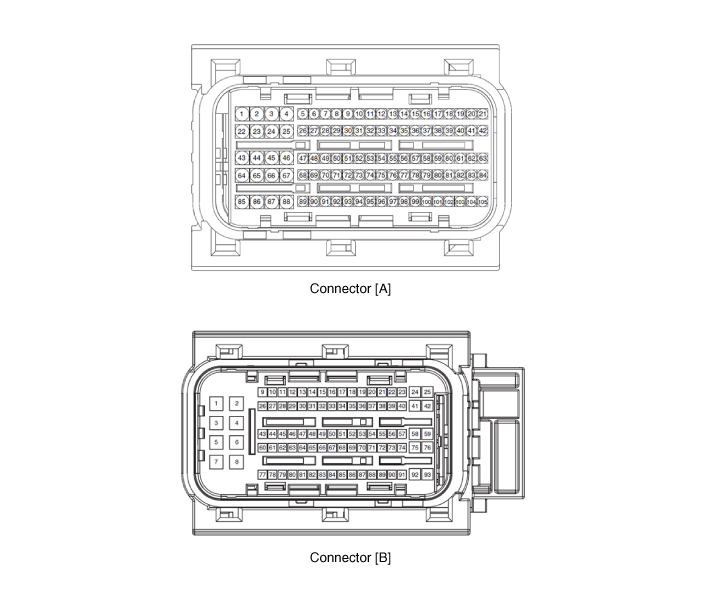
Terminal
|
Description
|
1
|
Fuel Pressure Regulator Valve (FPRV) [High] Control
|
2
|
Integrated Thermal Management Module (ITM) Motor (+)
|
3
|
Integrated Thermal Management Module (ITM) Motor (-)
|
4
|
Exhaust Gas Temperature Sensor (EGTS) #2 (T4) Ground [GPF Type]
|
5
|
Engine Coolant Temperature Sensor (ECTS) #1 Ground
|
6
|
-
|
7
|
Engine Coolant Temperature Sensor (ECTS) #2 Ground
|
8
|
Differential Pressure Valve (DPV) Ground
|
9
|
Rail Pressure Sensor (RPS) Ground
|
10
|
Exhaust Gas Temperature Sensor (EGTS) Ground
|
11
|
Manifold Absolute Pressure Sensor (MAPS) Ground
|
12
|
Electric Waste Gate Control Actuator (EWGA) Ground
|
13
|
EGR Pressure Sensor Ground
|
14
|
Oil Pressure & Temperature Sensors (OPTS) Ground
|
15
|
Electric Exhaust Gas Recirculation (EEGR) Control Valve Ground
|
16
|
-
|
17
|
A/C Pressure Transducer (APT) Ground
|
18
|
Sensor Power (+5V) (Camshaft Position Sensor (CMPS) [Bank 1 / Intake, Exhaust])
|
19
|
Sensor Power (+5V) (Manifold Absolute Pressure Sensor (MAPS))
|
Sensor Power (+5V) (Electric Exhaust Gas Recirculation (EEGR))
|
Sensor Power (+5V) (Crankshaft Position Sensor (CKPS))
|
20
|
Sensor Power (+5V) (Oil Pressure & Temperature Sensors (OPTS))
|
Sensor Power (+5V) (Electric Throttle Control Module (ETC))
|
Sensor Power (+5V) (Rail Pressure Sensor (RPS))
|
21
|
Throttle Position Sensor (TPS) Ground
|
22
|
Electric Exhaust Gas Recirculation (EEGR) Control Valve Motor (+)
|
23
|
Electric Exhaust Gas Recirculation (EEGR) Control Valve Motor (-)
|
24
|
Knock Sensor (KS ) Shield Ground
|
25
|
-
|
26
|
Ignition Coil (Cylider #3) Control
|
27
|
-
|
28
|
-
|
29
|
Exhaust Gas Temperature Sensor (EGTS) #1 (T3) Ground [GPF Type]
|
30
|
-
|
31
|
-
|
32
|
-
|
33
|
EGR Pressure Sensor Signal
|
34
|
-
|
35
|
Integrated Thermal Management Module (ITM) Motor Ground
|
36
|
-
|
37
|
Camshaft Position Sensor (CMPS) [Bank 1 / Intake] Signal
|
38
|
-
|
39
|
Electric Waste Gate Control Actuator (EWGA) Signal
|
40
|
Sensor Power (+5V) (EGR Pressure Sensor)
|
Sensor Power (+5V) (Electric Waste Gate Control Actuator (EWGA))
|
41
|
Sensor Power (+5V) (Accelerator Position Sensor (APS #1))
|
42
|
Sensor Power (+5V) (Brake Booster Vacuum Pressure Sensor (BBVPS))
|
Sensor Power (+5V) (A/C Pressure Transducer (APT))
|
43
|
Injector (Cylinder #3) [+] Control
|
44
|
Injector (Cylinder #2) [+] Control
|
45
|
-
|
46
|
-
|
47
|
CCP-CAN [High]
|
48
|
Ignition Coil (Cylinder #1) Control
|
49
|
-
|
50
|
Neutral Switch [With ISG]
|
51
|
-
|
52
|
-
|
53
|
-
|
54
|
Exhaust Gas Temperature Sensor (EGTS) #1 (T3) Signal [GPF Type]
|
55
|
-
|
56
|
Exhaust Gas Temperature Sensor (EGTS) #2 (T4) Signal [GPF Type]
|
57
|
-
|
58
|
Differential Pressure Sensor (DPS) Signal
|
59
|
Exhaust Gas Temperature Sensor (EGTS) Signal
|
60
|
Camshaft Position Sensor (CMPS) [Bank 1 / Exhaust] Ground
|
61
|
Mass Air Flow Sensor (MAFS) Signal
|
62
|
-
|
63
|
Engine Speed Signal Output
|
64
|
Injector (Cylinder #1) [+] Control
|
65
|
Injector (Cylinder #4) [+] Control
|
66
|
Injector (Cylinder #3) [-] Control
|
67
|
Injector (Cylinder #4) [-] Control
|
68
|
Ignition Coil (Cylider #2) Control
|
69
|
CCP-CAN [Low]
|
70
|
Camshaft Position Sensor (CMPS) [Bank 1 / Exhaust] Signal
|
71
|
Crankshaft Position Sensor (CKPS) Ground
|
72
|
Ignition Lock Switch [M/T & Without Smart Key]
|
73
|
Oil Pressure Sensor (OPS) Signal
|
74
|
Intake Air Temperature Sensor (IATS) Signal
|
75
|
Engine Coolant Temperature Sensor (ECTS) #1 Signal
|
76
|
Engine Coolant Temperature Sensor (ECTS) #2 Signal
|
77
|
Electric Exhaust Gas Recirculation (EEGR) Control Valve Signal
|
78
|
Differential Pressure Valve (DPV) Signal
|
79
|
Throttle Position Sensor (TPS) #2 Signal
|
80
|
Rail Pressure Sensor (RPS) Signal
|
81
|
-
|
82
|
Integrated Thermal Management Module (ITM) Motor Signal
|
83
|
Mass Air Flow Sensor (MAFS) Ground
|
84
|
A/C Pressure Transducer (APT) Signal
|
85
|
-
|
86
|
Injector (Cylinder #2) [-] Control
|
87
|
Injector (Cylinder #1) [-] Control
|
88
|
Fuel Pressure Regulator Valve (FPRV) [Low] Control
|
89
|
Differential Pressure Sensor (DPS) Ground
|
90
|
Ignition Coil (Cylinder #4) Control
|
91
|
Crankshaft Position Sensor (CKPS) Signal
|
92
|
-
|
93
|
Heated Oxygen Sensor (HO2S) [Bank 1 / Sensor 2] Ground
|
94
|
-
|
95
|
Heated Oxygen Sensor (HO2S) [Bank 1 / Sensor 2] Signal
|
96
|
-
|
97
|
Oil Temperature Sensor (OTS) Signal
|
98
|
Throttle Position Sensor (TPS) #1 Signal
|
99
|
-
|
100
|
-
|
101
|
Manifold Absolute Pressure Sensor (MAPS) Signal
|
102
|
Camshaft Position Sensor (CMPS) [Bank 1/Intake] Ground
|
103
|
-
|
104
|
Knock Sensor (KS) Signal
|
105
|
Knock Sensor (KS) Ground
|
Terminal
|
Description
|
1
|
Chassis Ground
|
2
|
Chassis Ground
|
3
|
Battery Power (B+) (Battery)
|
4
|
Chassis Ground
|
5
|
Battery Power (B+) (Main Relay)
|
6
|
Battery Power (B+) (Main Relay)
|
7
|
-
|
8
|
-
|
9
|
Sensor Power (+5V) (Integrated Thermal Management Module (ITM) Motor)
|
Sensor Power (+5V) (Mass Air Flow Sensor (MAFS))
|
10
|
Sensor Power (+5V) (Accelerator Position Sensor (APS) #2)
|
11
|
Boost Pressure Sensor (BPS) Signal Input
|
12
|
Accelerator Position Sensor (APS) #2 Ground
|
13
|
Accelerator Position Sensor (APS) #1 Ground
|
14
|
Brake Booster Vacuum Pressure Sensor (BBVPS) Ground [With ISG]
|
15
|
-
|
16
|
Boost Pressure Sensor (BPS) Ground
|
17
|
Fuel Level Sender (FLS) Signal
|
18
|
Accelerator Position Sensor (APS #2) Signal
|
19
|
-
|
20
|
-
|
21
|
-
|
22
|
RCV Control Solenoid Valve Control
|
23
|
Cooling Fan Relay [PWM] Control
|
24
|
Electric Waste Gate Control Actuator (EWGA) DC Motor (+) Control
|
25
|
Electric Waste Gate Control Actuator (EWGA) DC Motor (-) Control
|
26
|
Ignition Switch Signal Input
|
27
|
Sensor Power (+5V) (Differential Pressure Sensor (DPS))
|
Sensor Power (+5V) (Differential Pressure Valve (DPV))
|
Sensor Power (+5V) (Boost Pressure Sensor (BPS))
|
28
|
-
|
29
|
-
|
30
|
Brake Light Switch Signal Input
|
31
|
Brake Test Switch Signal Input
|
32
|
Accelerator Position Sensor (APS #1) Signal
|
33
|
-
|
34
|
ISG OFF Switch Signal Input [With ISG]
|
35
|
Start Signal Input
|
36
|
-
|
37
|
Fuel Pump Relay Control [W/O Smart Key]
|
38
|
DC/DC Converter (LDC) Control [With ISG]
|
39
|
-
|
40
|
Variable Oil Pump Valve Control
|
41
|
ETC Motor [+] Control
|
42
|
ETC Motor [-] Control
|
43
|
-
|
44
|
LIN communication signal input
|
45
|
C-CAN (Low)
|
46
|
-
|
47
|
-
|
48
|
Clutch Switch [M/T]
|
49
|
Wiper Switch Signal Input
|
50
|
Blower Motor MAX Input
|
51
|
Start Relay Control (Low Side)
|
52
|
-
|
53
|
-
|
54
|
Rear Defrost Switch Signal Input
|
55
|
-
|
56
|
-
|
57
|
-
|
58
|
Differential Pressure Valve (DPV) DC Motor (+) Control
|
59
|
Differential Pressure Valve (DPV) DC Motor (-) Control
|
60
|
Battery Power (B+) (Battery)
|
61
|
LIN Communication Signal input
|
62
|
C-CAN (High)
|
63
|
Brake Booster Vacuum Pressure Sensor (BBVPS) Signal [With ISG]
|
64
|
Heated Oxygen Sensor (HO2S) [Bank 1 / Sensor 1] VS+ (NERNST Cell Voltage)
|
65
|
Heated Oxygen Sensor (HO2S) [Bank 1 / Sensor 1] Rc (Compensative Resistance)
|
66
|
Heated Oxygen Sensor (HO2S) [Bank 1 / Sensor 1] Rc/Rp (Pump Cell Voltage)
|
67
|
Heated Oxygen Sensor (HO2S) [Bank 1 / Sensor 1] VS-/IP- (Common Ground for
VS, IP)
|
68
|
-
|
69
|
A/C Compressor Relay Control
|
70
|
-
|
71
|
Start Relay Control (High side)
|
72
|
-
|
73
|
-
|
74
|
Engine Control Relay Control
|
75
|
Heated Oxygen Sensor (HO2S) [Bank 1 / Sensor 1] Heater Control
|
76
|
Heated Oxygen Sensor (HO2S) [Bank 1 / Sensor 2] Heater Control
|
77
|
Vehicle Speed Signal Input
|
78
|
CCP-CAN [High]
|
79
|
CCP-CAN [Low]
|
80
|
-
|
81
|
-
|
82
|
-
|
83
|
Purge Control Solenoid Valve (PCSV) Control
|
84
|
Fuel Pump Relay Control [With Smart Key]
|
85
|
ISG OFF Switch (IND.) [With ISG]
|
86
|
-
|
87
|
Immobilizer signal input
|
88
|
-
|
89
|
-
|
90
|
-
|
91
|
-
|
92
|
Variable Force Solenoid (VFS) [Bank 1 / Intake] Control
|
93
|
CVVT Oil Control Valve (OCV) [Bank 1 / Exhaust] Control
|
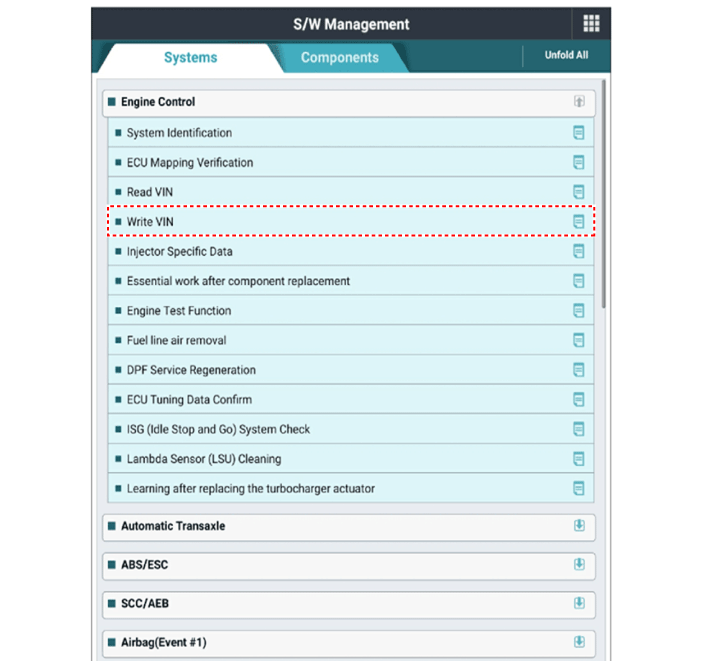
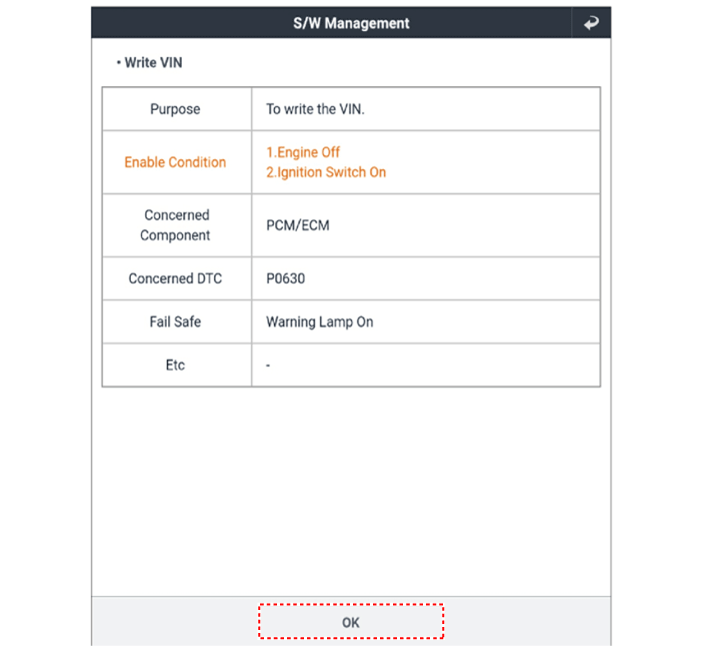
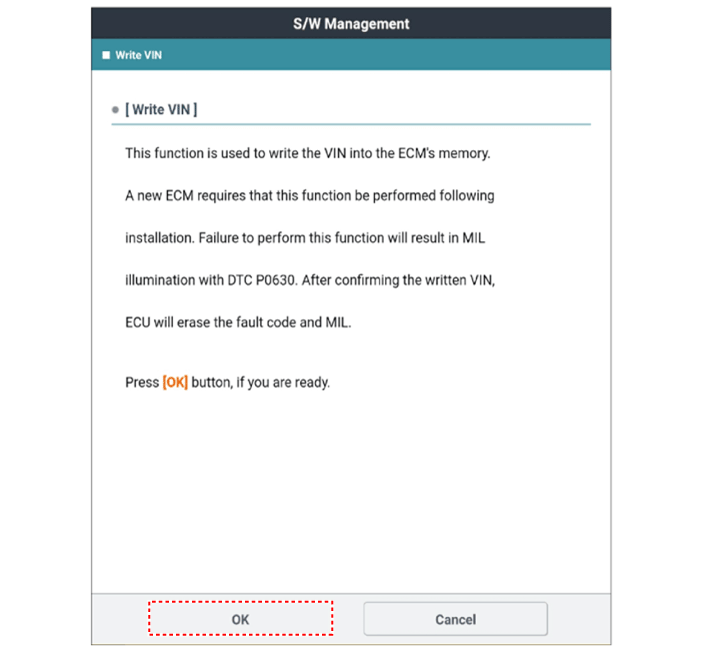
VIN (Vehicle Identification Number) is a number that has the vehicle's information
(Maker, Vehicle Type, Vehicle Line/Series, Body Type, Engine Type, Transmission
Type, Model Year, Plant Location and so forth. For more information, please
refer to the group "GI" in this SERVICE MANUAL). When replacing an ECM, the
VIN must be programmed in the ECM. If there is no VIN in ECM memory, the fault
code (DTC P0630) is set.
 Description and operation
 Mass Air Flow Sensor (MAFS)