Hyundai i-30: Rear Seat / Rear Back Armrest
Hyundai i30 (PD) 2018-2025 Service Manual / Body (Interior and Exterior) / Rear Seat / Rear Back Armrest
Repair procedures
| Replacement |
|

| 1. |
Remove the rear seat back assembly [LH].
(Refer to Rear Seat - "Rear Seat Assembly")
|
| 2. |
After loosening the mounting bolt, remove the rear back armreat (A).
|
| 3. |
To install, reverse the removal procedure.
|
 Rear Seat Cushion Cover
Components and components location
Component Location
1. Rear seat
cushion cover
Repair procedures
Replacement
•
Put on gloves to prevent hand injuries...
 Rear Seat Latch
Components and components location
Components Location
1. Reat seat
latch [LH]
2. Reat seat
latch [RH]
Repair procedures
Replacement
[LH]
•
When prying with a flat-tip screwdriver or use a prying trim
tool, wrap it with protective tape, and apply protective tape
around the related parts, to prevent damage...
Other information:
Hyundai i30 (PD) 2018-2025 Service Manual: Special service tools
..
Hyundai i30 (PD) 2018-2025 Service Manual: Components and components location
Components Location 1. ECM (Engine Control Module) 2. Mass Air Flow Sensor (MAFS) 3. Manifold Absolute Pressure Sensor (MAPS) 4. Intake Air Temperature Sensor (IATS) 5. Boost Pressure Sensor (BPS) 6...
Categories
- Manuals Home
- 3rd Generation i30 Owners Manual
- 3rd Generation i30 Service Manual
- Engine compartment
- Battery replacement
- Engine coolant
- New on site
- Most important about car
Air bag - supplemental restraint system
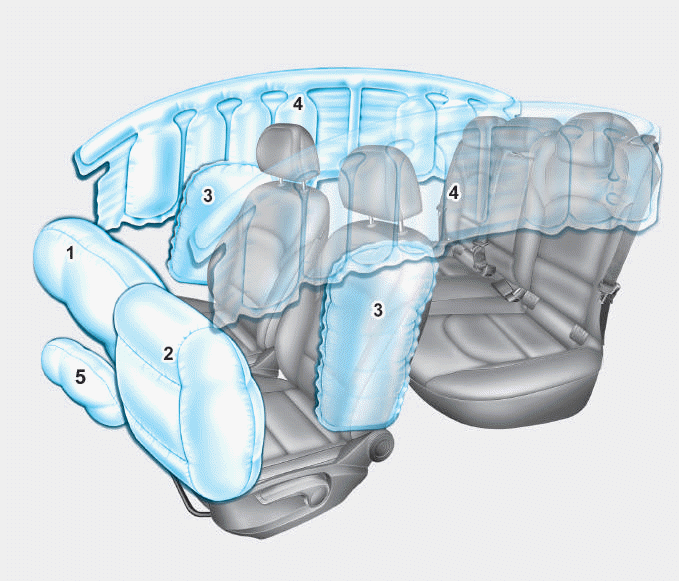
1. Driver’s front air bag
2. Passenger’s front air bag
3. Side air bag*
4. Curtain air bag*
5. Knee air bag*
6. Front passenger air bag ON/OFF
switch

Copyright © 2025 www.hi30.net