Hyundai i-30: Audio / Speakers
Repair procedures
| Troubleshooting of the speakers |
|
When handling the speakers :
| •
|
Do not cause shock to the speakers by dropping or throwing them.
|
| •
|
Be careful not to drop water and oil on the speakers.
|
| •
|
Use caution to handle the speaker because diaphragm made of
paper is easily torn by impact or external force.
|
| •
|
Audio system tuning may cause damage to the speakers. The modified
speakers are not covered by the manufacturer’s warranty.
|
|
|
1. |
Basic inspection
Loosen the screws to rule out the interference from the body trims and
surrounding parts and then remove the speaker.
After removing the speaker, check the sound quality of the speaker with
the connector plugged in.
|
|
2. |
Inspection for each cause
|
(1) |
Abnormal vibration
|
– |
Make sure the mounting screws are properly tightened
before replacing the speaker.
|
|
– |
Reinstall the speaker and check that the symptom is
resolved.
|
|
– |
If the symptom does not disappear, replace the speaker
with a new one.
|
|
|
(2) |
Noise
|
– |
Check that the speaker connector is properly connected
and reinstall the connector if necessary.
|
|
– |
If noises occur in the radio mode, turn to the CD player
mode.
|
|
– |
If noises occur in both modes, replace the speaker with
a new one.
|
|
• |
If noises occur only in the radio mode, the
poor radio reception is the cause so do not
replace the speaker.
|
|
|
|
(3) |
Poor working
|
– |
Check the plus (+) and negative (-) speaker terminals
using an ohmmeter. (Check the disconnector / short)
|
|
– |
Check the supply power to the speaker and the resistance,
then inspect the sound quality.
|
|
|
Front Door Speaker
|
1. |
Disconnect the negative (-) battery terminal.
|
|
2. |
Remove the front door trim.
(Refer to Body - "Front Door Trim")
|
|
3. |
Remove the front door speaker (B) after disconnecting the connector
(A) and loosening the screws.
|
Rear Door Speaker
|
1. |
Disconnect the negative (-) battery terminal.
|
|
2. |
Remove the Rear door trim.
(Refer to Body - "Rear Door Trim")
|
|
3. |
Remove the rear door speaker (B) after disconnecting the connector (A)
and loosening the screws.
|
Front Door Speaker
|
1. |
Install the front door speaker.
|
|
2. |
Install the front door trim.
|
|
3. |
Connect the negative (-) battery terminal.
|
Rear Door Speake
|
1. |
Install the rear door speaker.
|
|
2. |
Install the front door trim.
|
|
3. |
Connect the negative (-) battery terminal.
|
| •
|
Make sure that the connectors are plugged in properly.
|
| •
|
Check the audio system for normal operation.
|
|
Components and components location
Components
Audio
Connector Pin Information
NO
Connector A
Connector B
1
Rear left speaker (+)
-
2
Front left speaker (+)
-
3
Front right speaker (+)
-
4
Rear right speaker (+)
Steering wheel key
5
-
-
6
Door open
USB data (HI)
7
IGN 1
USB VCC
8
ILL (+)
-
9
DETENT
-
10
Rear left speaker (-)
MIC signal (+)
11
Front left speaker (-)
ACC
12
Front right speaker (-)
Battery (+)
13
Rear right speaker (-)
-
14
-
-
15
-
-
16
-
Speed
17
ILL (-)
Steering wheel key GND
18
Antenna Power
USB data (LOW)
19
USB GND
20
-
21
-
22
MIC signal (-)
23
-
24
GND
Display Audio
Connector Pin Information
No
Connector A
Connector B
1
Rear door speaker (Left +)
-
2
Rear door speaker (Left -)
Mic_Signal (+)
3
USB Ground
-
4
USB Data_High
-
5
USB Data_Low
Antenna power
6
USB_VCC
Illumination (+)
7
Camera video
MM CAN (High)
8
-
-
9
-
-
10
AUX Audio R
Battery (+)
11
AUX Detect
Battery (+)
12
Steering wheel remote
Ground
13
Front door speaker (Left +)
Ground
14
Front door speaker (Left -)
Mic_Ground
15
Front door speaker (Right -)
Mic_Signal (-)
16
Front door speaker (Right +)
-
17
-
-
18
-
Vehicle speed
19
-
Illumination (-)
20
Camera power ground
MM CAN (Low)
21
Camera video ground
-
22
-
ACC
23
-
-
24
AUX Audio L
-
25
AUX Audio ground
-
26
Steering wheel remote grond
Door open
27
Rear door speaker (Right -)
-
28
Rear door speaker (Right +)
-
29
-
-
30
-
-
31
-
-
32
Camera power ground
IGN 1
33
Camera shield ground
-
34
-
-
35
-
-
36
Camera_Detect
37
-
38
-
Repair procedures
Removal
•
When removing with a flat-tip screwdriver or remover, wrap protective
tape around the tools to prevent damage to components...
Components and components location
Components
[AM/FM Antenna]
Repair procedures
Removal
Roof Antenna
1...
Other information:
The drive mode may be selected
according to the driver's preference
or road condition.
The system resets to be in the NORMAL
mode (except if it is in ECO
mode), when the engine is restarted.
Information
If there is a problem with the instrument
cluster, the drive mode will be in
NORMAL mode and may not change
to SPORT mode...
Forward and rearward adjustment
To move the seat forward or rearward:
1. Pull up the seat slide adjustment
lever and hold it.
2. Slide the seat to the position you
desire.
3. Release the lever and make sure
the seat is locked in place. Move
forward and rearward without using
the lever...
Categories
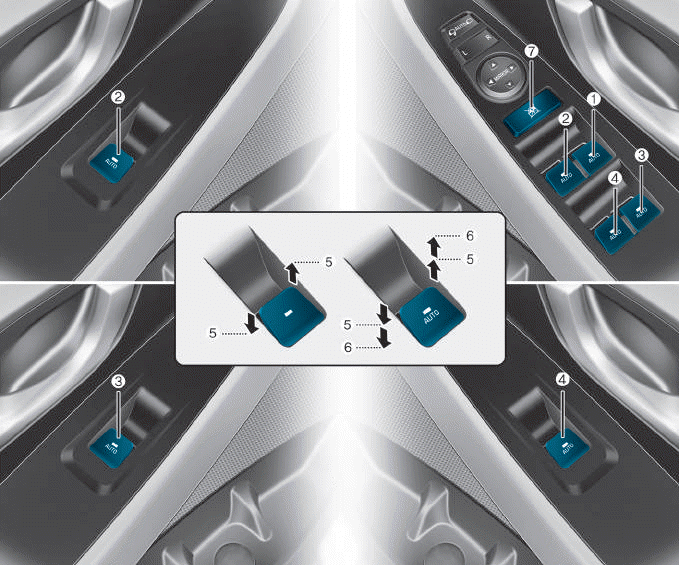
(1) Driver’s door power window
switch
(2) Front passenger’s door power
window switch
(3) Rear door (right) power window
switch
(4) Rear door (left) power window
switch
(5) Window opening and closing
(6) Automatic power window
(7) Power window lock switch
read more


 Audio Unit
 Antenna