Hyundai i-30: Wireless Power Charger System / Wireless Power Charging Unit
Hyundai i30 (PD) 2018-2025 Service Manual / Body Electrical System / Wireless Power Charger System / Wireless Power Charging Unit
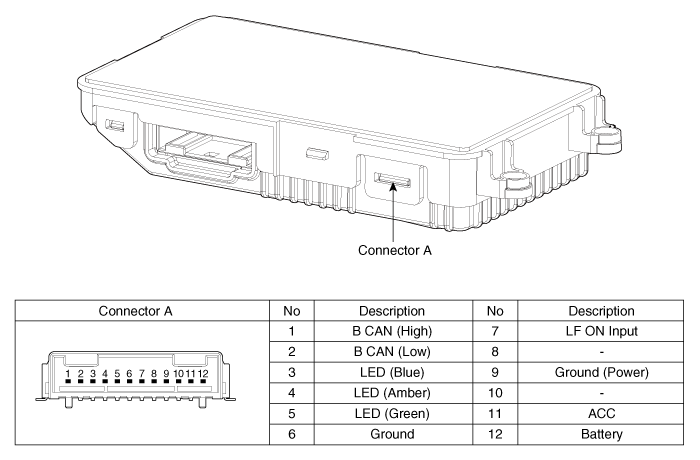
Components and positions
| Components |
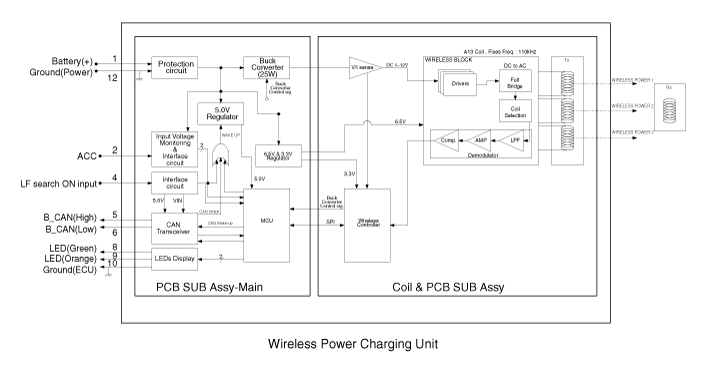
Circuit diagram
| Circuit Diagram |
Repair procedures
| Removal |
Handling wireless charging system parts by wet hands may cause electric
shock.
|

| 1. |
Disconnect the negative (-) battery terminal.
|
| 2. |
Remove the floor console cover assembly.
(Refer to Body - "Floor Console Assembly")
|
| 3. |
Remove the wireless power charger unit (A) after mounting screws and
disconnecting the connector (B).
|
| Installation |
| 1. |
Install the wireless power charging unit.
|
| 2. |
Connect the wireless power charging unit connectors.
|
| 3. |
Install the floor console assembly.
|
| 4. |
Connect the negative (-) battery terminal.
|
| [Diagnosis With KDS/GDS] |
| 1. |
The body electrical system can be more quickly diagnosed for troubles
by using the vehicle diagnostic system (KDS/GDS).
KDS/GDS provides the following information.
|
| 2. |
To diagnose the vehicle by using the diagnostic equipment, select "vehicle
model" and "wireless power charger system" to be inspected.
|
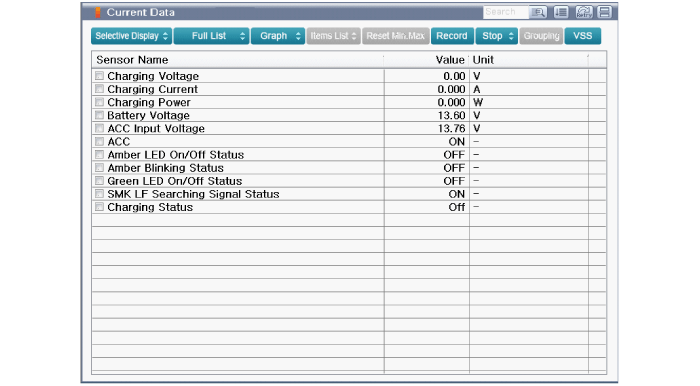
| 3. |
To inquire the current status of input/output values, select the "Sensor
Data" menu
The input/output values of the sensors corresponding to the selected
module can be checked.
|
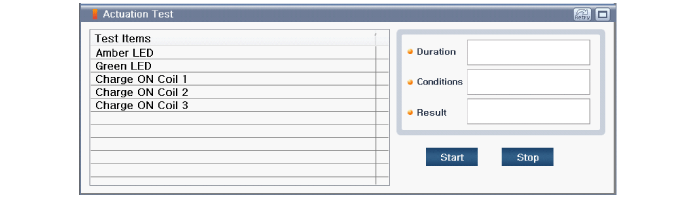
| 4. |
To perform forced operation of the selected module input, select "Actuation
Test".
|
| 5. |
To inquire the cause of trouble for each module by self diagnosis, select
'Diagnostic Trouble Code'.
|
 Troubleshooting
Troubleshooting
Wireless Power Charger System Troubleshooting
Trouble status
Inspection item
Inspection
Not charged
Check the mobile phone status
R-1
Amber LED blinks
Overcurrent
R-2
Overheating
R-2
Foreign matter
R-2
R-1...
 Wireless Charging Lamp
Components and positions
Components
Repair procedures
Removal
Handling wireless charging system parts by wet hands may cause electric
shock...
Other information:
Hyundai i30 (PD) 2018-2025 Owner's Manual: AUTO HOLD Indicator Light. Electric Power Steering (EPS) Warning Light. Malfunction Indicator Lamp (MIL)
AUTO HOLD Indicator Light This indicator light illuminates: [White] When you activate the auto hold system by pressing the AUTO HOLD button. [Green] When you stop the vehicle completely by depressing the brake pedal with the auto hold system activated...
Hyundai i30 (PD) 2018-2025 Service Manual: Coolant
Repair procedures Replacement and Air Bleeding • Never remove the reservoir tank cap when the engine is hot. Serious scalding could be caused by hot fluid under high pressure escaping from the radiator...
Categories
- Manuals Home
- 3rd Generation i30 Owners Manual
- 3rd Generation i30 Service Manual
- Drive mode integrated control system
- Front windscreen wiper service position
- Tyre pressure monitoring system
- New on site
- Most important about car
Bonnet
Opening the bonnet
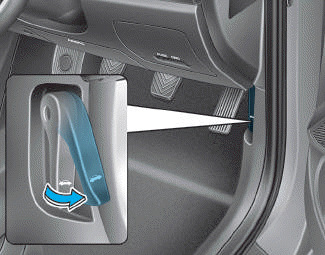
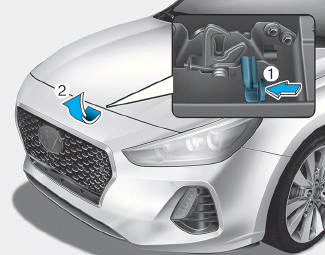
1. Park the vehicle and set the parking brake.
2. Pull the release lever to unlatch the bonnet. The bonnet should pop open slightly.

Copyright © 2025 www.hi30.net