Hyundai i30 (PD): Light bulbs / Rear combination lamp bulb replacement
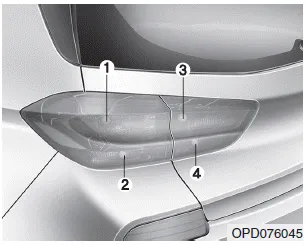
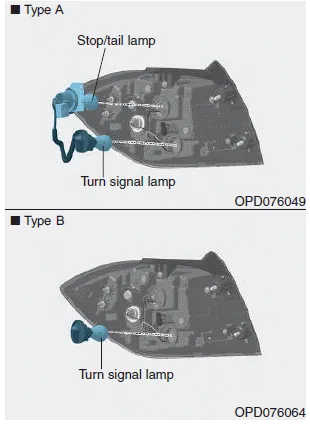
Type A (5 Door)
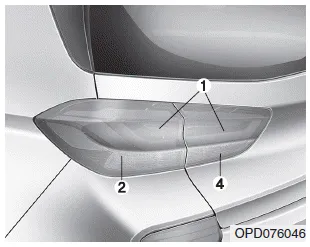
Type B (5 Door)
Type C (5 Door, 5 Door (N Line))
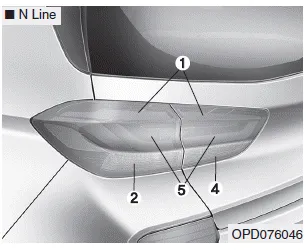
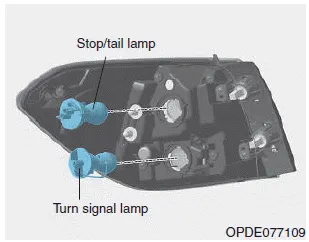
(1) Stop/Tail lamp
(2) Turn signal lamp
(3) Tail lamp
(4) Backup lamp
(5) Stop lamp
Stop/Tail lamp (Type A) and turn signal lamp

1. Turn off the engine.
2. Open the tailgate.
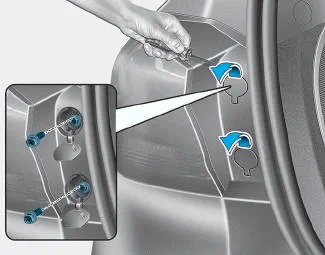
3. Open the lamp assembly retaining screw covers.
4. Loosen the lamp assembly retaining screws with a cross-tip screwdriver.
5. Remove the rear combination lamp assembly from the body of the vehicle.
6. Remove the socket from the assembly by turning the socket counterclockwise until the tabs on the socket align with the slots on the assembly.
7. Remove the bulb from the socket by pressing it in and rotating it counterclockwise until the tabs on the bulb align with the slots in the socket. Pull the bulb out of the socket.
8. Insert a new bulb by inserting it into the socket and rotating it until it locks into place.
9. Install the socket into the assembly by aligning the tabs on the socket with the slots in the assembly. Push the socket into the assembly and turn the socket clockwise.
10. Reinstall the lamp assembly to the body of the vehicle.
Stop/Tail lamp (Type B, Type C)
If the LED lamp does not operate, we recommend that you have the vehicle checked by a HYUNDAI authorised repairer.
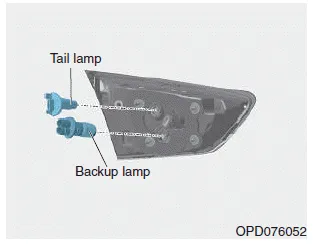
Type A - Tail lamp and backup lamp
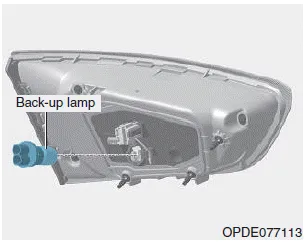
Type B, Type C - Backup lamp

1. Turn off the engine.
2. Open the tailgate.
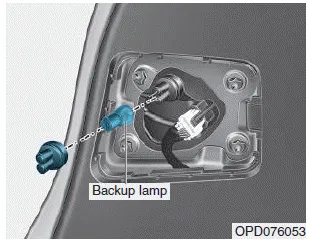
3. Remove the service cover using a flat-blade screwdriver.
Type A
4. Remove the socket from the assembly by turning the socket counterclockwise until the tabs on the socket align with the slots on the assembly.
5. Remove the bulb by pulling it straight out.
6. Insert a new bulb by inserting it into the socket and rotating it until it locks into place.
7. Install the socket into the assembly by aligning the tabs on the socket with the slots in the assembly. Push the socket into the assembly and turn the socket clockwise.
8. Reinstall the service cover.
Type B, Type C
4. Remove the bulb by pulling it straight out.
5. Insert a new bulb by inserting it into the socket and rotating it until it locks into place.
6. Install the socket into the assembly by aligning the tabs on the socket with the slots in the assembly. Push the socket into the assembly and turn the socket clockwise.
7. Reinstall the service cover.
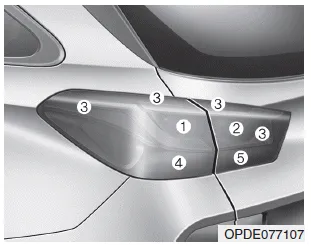
Type D (Wagon)
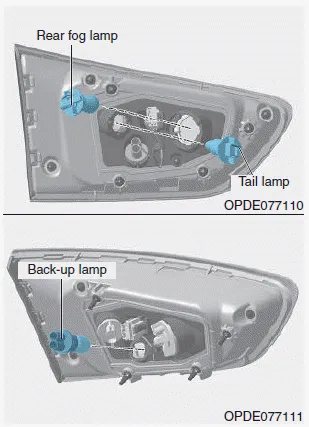
(1) Stop/Tail lamp
(2) Tail lamp
(3) Turn signal lamp
(4) Back-up lamp
(5) Rear fog lamp
Stop/Tail lamp and turn signal lamp
1. Turn off the engine.
2. Open the tailgate.
3. Open the lamp assembly retaining screw covers.
4. Loosen the lamp assembly retaining screws with a cross-tip screwdriver.

5. Remove the rear combination lamp assembly from the body of the vehicle.
6. Remove the socket from the assembly by turning the socket counterclockwise until the tabs on the socket align with the slots on the assembly.
7. Remove the bulb from the socket by pressing it in and rotating it counterclockwise until the tabs on the bulb align with the slots in the socket. Pull the bulb out of the socket.
8. Insert a new bulb by inserting it into the socket and rotating it until it locks into place.
9. Install the socket in the assembly by aligning the tabs on the socket with the slots in the assembly. Push the socket into the assembly and turn the socket clockwise.
10. Reinstall the lamp assembly to the body of the vehicle.
Tail lamp, back-up lamp and rear fog lamp

1. Turn off the engine.
2. Open the tailgate.
3. Remove the service cover using a flat-blade screwdriver.
4. Remove the socket from the assembly by turning the socket counterclockwise until the tabs on the socket align with the slots on the assembly.
5. Remove the bulb by pulling it straight out.
6. Insert a new bulb by inserting it into the socket and rotating it until it locks into place.
7. Install the socket into the assembly by aligning the tabs on the socket with the slots in the assembly. Push the socket into the assembly and turn the socket clockwise.
8. Reinstall the service cover.
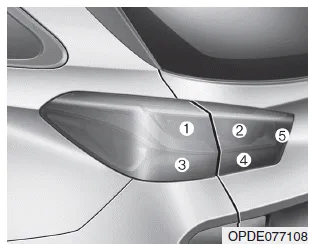
Type E (Wagon)
(1) Stop lamp
(2) Stop lamp/Rear fog lamp
(3) Tail lamp
(4) Turn signal lamp
(5) Back-up lamp
Stop lamp, tail lamp and stop lamp/rear fog lamp
If the LED lamp does not operate, we recommend that you have the vehicle checked by a HYUNDAI authorised repairer.
Turn signal lamp

1. Turn off the engine.
2. Open the tailgate.
3. Open the lamp assembly retaining screw covers.
4. Loosen the lamp assembly retaining screws with a cross-tip screwdriver.

5. Remove the rear combination lamp assembly from the body of the vehicle.

6. Remove the socket from the assembly by turning the socket counterclockwise until the tabs on the socket align with the slots on the assembly.
7. Remove the bulb from the socket by pressing it in and rotating it counterclockwise until the tabs on the bulb align with the slots in the socket. Pull the bulb out of the socket.
8. Insert a new bulb by inserting it into the socket and rotating it until it locks into place.
9. Install the socket into the assembly by aligning the tabs on the socket with the slots in the assembly. Push the socket into the assembly and turn the socket clockwise.
10. Reinstall the lamp assembly to the body of the vehicle
Backup lamp

1. Turn off the engine.
2. Open the tailgate.
3. Remove the service cover using a flat-blade screwdriver.
4. Remove the socket from the assembly by turning the socket counterclockwise until the tabs on the socket align with the slots on the assembly.
5. Remove the bulb by pulling it straight out.
6. Insert a new bulb by inserting it into the socket and rotating it until it locks into place.
7. Install the socket into the assembly by aligning the tabs on the socket with the slots in the assembly. Push the socket into the assembly and turn the socket clockwise.
8. Reinstall the service cover.
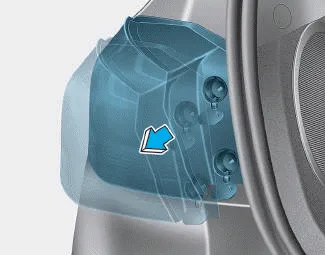
Type A If the light bulb does not operate, we recommend that you have the vehicle checked by a HYUNDAI authorised repairer. Type B 1.Remove the lamp assembly from the vehicle by prying the lens and pulling the assembly out.
1. Loosen the pin-type retainers and screws of the rear wheel guard and then detach it from the rear bumper. 2. Reach your hand into the back of the rear bumper.
Other information:
Hyundai i30 (PD) 2018-2024 Owner's Manual: Smart Cruise Control Vehicleto- Vehicle Distance
To set Vehicle-to-Vehicle Distance When the Smart Cruise Control System is ON, you can set and maintain the distance from the vehicle ahead of you without pressing the accelerator or brake pedal. Each time the button is pressed, the vehicle to vehicle distance changes as follows: For example, if you drive at 56 mph (90 km/h),
Hyundai i30 (PD) 2018-2024 Owner's Manual: Using the Tyre Mobility Kit
CAUTION Detach the speed restriction label (1) from the sealant bottle (2), and place it in a highly visible place inside the vehicle such as on the steering wheel to remind the driver not to drive too fast. 1. Shake the sealant bottle (2).
Categories
- Manuals Home
- Hyundai i30 Owners Manual
- Trip computer
- Rear combination lamp bulb replacement
- Your vehicle at a glance
- New on site
- Most important about car
