Hyundai i-30: Panorama sunroof / Front Glass
Repair procedures
| •
|
In order to remove the front glass, use the tools shown in the
following figure:
[Tooling Diagram]

① Square wire
② Insert-type wire grip
|
| •
|
Insert and affix square wire ① into the insert hole of the wire
grip ②.
[Tooling Assembly Diagram]
|
|
|
1. |
Press panorama sunroof switch to fully open the movable glass.
|
|
2. |
Remove the roof side moulding.
(Refer to Body Side Moulding - "Roof Side Moulding")
|
|
3. |
Pull the square wire (A) to the left and right, then apply a force in
the direction of the arrow to cut off the residual sealant.
|
• |
Longer wires require more power, so divide Section ①
and ② in half to cut off residual sealant.
|
|
|
• |
Make sure that you put on gloves to protect your hands
from potential injury.
|
|
• |
Be careful about potentially burning your hands due
to the heat generated from the wire in use.
|
|
• |
Be careful when working with wiring because it may be
cut.
|
|
|
• |
Be careful not to damage the body.
|
|
|
|
4. |
Remove the front glass (A) carefully without damaging it.

|
| •
|
In order to mount the front glass, use the tools shown in the
following figure :
[Tooling Diagram]
① Sealant nozzle
② Adhesive sealant for car windows
③ Sealant gun
|
|
|
1. |
Install the roof side moulding.
|
|
2. |
Press panorama sunroof switch to fully close the movable glass.
|
|
3. |
Use a blade to cut off residual sealant (A) around body panel.
|
• |
When cutting off the residual sealant around the body
panel, make sure to leave about 2mm of sealant from
the adhesive surface.
|
|
|
• |
Make sure that the body paint surface is not damaged
at all.
|
|
• |
If it is damaged, apply paint or rust inhibitor for
maintenance.
|
|
|
|
4. |
Use alcohol or an air gun to clean up the edges of the body panel and
front glass.
|
|
5. |
Use a sealant gun to apply sealant (B) around body panel (A).
|
• |
When using a sealant gun to apply the sealant, make
sure that the sealant is not cracked to prevent water
leaks.
|
|
|
|
6. |
Install the front glass (A) loosely on the body panel.
|
|
7. |
Check step and gap before front glass (A) is fully mounted.
|
|
8. |
Apply tape to around the front glass to prevent the glass from coming
off.
|
• |
If sealant is excessively applied, it may ooze out of
the body. Use alcohol or a cleaning agent to wipe off
the residual sealant.
|
|

|
• |
Mount front glass and set the car on a flat surface
at least for 4 hours.
|
|
• |
If you have to drive the car, be sure to SLOWLY drive
the car for at least 8 hours after mounting.
|
|
• |
Alert the driver to avoid driving the car aggressively
for 2-3 days, or avoid driving it on irregular road
surfaces.
|
|
|
Repair procedures
Replacement
1.
Open movable glass completely pressing panorama sunroof switch.
2...
Repair procedures
Replacement
1.
Fully open the movable glass using the panorama sunroof switch.
2...
Other information:
WARNING
Snow tyres should be equivalent
in size and type to the vehicle's
standard tyres. Otherwise, the
safety and handling of your vehicle
may be adversely affected.
We recommend you use snow tyres
when road temperature is below
45°F (7°C)...
Your vehicle is equipped with emergency
commodities to help you
respond to emergency situation.
Fire extinguisher
If there is small fire and you know how
to use the fire extinguisher, follow
these steps carefully.
1. Pull out the safety pin at the top of
the extinguisher that keeps the handle
from being accidentally pressed...
Categories
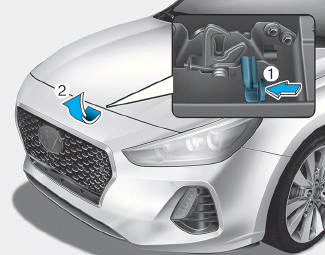
Opening the bonnet
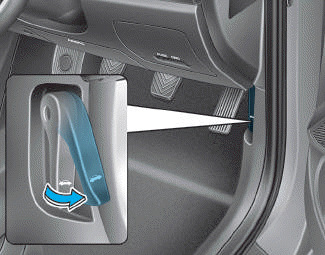
1. Park the vehicle and set the parking
brake.
2. Pull the release lever to unlatch
the bonnet. The bonnet should
pop open slightly.
read more


 Movable Glass
 Panorama Sunroof Deflector