Hyundai i-30: Interior Trim / Luggage Side Trim
Hyundai i30 (PD) 2018-2025 Service Manual / Body (Interior and Exterior) / Interior Trim / Luggage Side Trim
Components and components location
| Component Location |
| 1. Luggage side
trim |
Repair procedures
| Replacement |
|

|

| 1. |
Remove the rear seat assembly
(Refer to Rear Seat - "Rear Seat Assembly")
|
| 2. |
Carefully remove the rear door body side weatherstrip.
|
| 3. |
Carefully remove the tail gate weatherstrip.
|
| 4. |
Remove the rear door scuff trim.
(Refer to Interior Trim - "Door Scuff Trim")
|
| 5. |
Remove the rear transverse trim.
(Refer to Interior Trim - "Rear Transverse Trim")
|
| 6. |
After loosening the mounting bolts and clip, remove the luggage side
trim (A).
|
| 7. |
To install, reverse removal procedure.
|

 Rear Transverse Trim
Components and components location
Component Location
1. Rear transverse
trim
Repair procedures
Replacement
•
Put on gloves to prevent hand injuries...
 Rear Pillar Trim
Components and components location
Component Location
1. Rear pillar
trim
Repair procedures
Replacement
•
Put on gloves to prevent hand injuries...
Other information:
Hyundai i30 (PD) 2018-2025 Service Manual: Engine Oil
Repair procedures Engine Oil and Filter Replacement • Prolonged and repeated contact with mineral oil will result in the removal of natural fats from the skin, leading to dryness, irritation and dermatitis...
Hyundai i30 (PD) 2018-2025 Owner's Manual: Rear centre seatbelt (3-point rear centre seat belt)
1. Insert the tongue plate (A) into the buckle (A’) until an audible “click" is heard, indicating the latch is locked. Make sure the belt is not twisted. 2. Pull the tongue plate (B) and insert it into the buckle (B’) until an audible “click” is heard, indicating the latch is locked...
Categories
- Manuals Home
- 3rd Generation i30 Owners Manual
- 3rd Generation i30 Service Manual
- Auto door lock/unlock features
- To activate the ISG system
- Engine coolant
- New on site
- Most important about car
Door locks
Operating door locks from outside the vehicle
Mechanical key
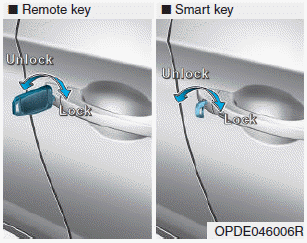
Turn the key toward the rear of the vehicle to unlock and toward the front of the vehicle to lock.
If you lock/unlock the driver's door with a key, a driver’s door will lock/unlock automatically.

Copyright © 2025 www.hi30.net